* Requires 1" body lift
.
CONTENTS
1) Vehicle Setup
2) Peformance Review
3) Modification Write-up
1) VEHICLE SETUP
A 1" body lift needs to be install prior to this modification
2) PERFORMANCE REVIEW
The stock HD skid plates found on some TJ Jeeps provide sufficient strength for general trail riding with the thicker steel, full coverage on 5 sides, and reinforcing ribbing. But it hangs down a fair amount (Fig 1). By utilizing the gap created between the chassis and body created with the installation of a 1" body lift, the stock gas tank and skid can be tucked up for increased ground clearance for essentially free. This improves the departure angle and reduces the number of times the tail end scrapes coming off a ledge or over a rock.
![Image]()
Fig 1. Stock gas tank skid plate hangs a bit low vs. after the mod
3) MODIFICATION WRITE-UP
Preparation:
The fist step is to make sure there is very little fuel in the fuel tank. At 6 lb. per gallon the gas adds up quick and it's a dynamic load that shifts around as you try and get the fuel tank out. So it is best to do this right before you have to refuel your Jeep.
Next, depressurize the fuel system by removing the fuel pump relay (Fig 2) and crank over the engine for a few seconds. Replace the relay and disconnect the ground from the battery for safety. Jack up the rear end and set on jack stand, remove driver's side tire for better access to tank connections (Fig 3 and 6).
![Image]()
Fig 2. Removing the fuel pump relay from the PDC for fuel system depresurization
![Image]()
Fig 3. Set rear axle on jacks stand, remove driver's side tire for better access to tank
Disconnecting Fuel Tank:
Remove 8 screws securing filler cap bezel to body and filler tube. Replace gas cap to keep dirt out of filler tube (Fig 4). Reach into fender cavity and snip zip tie holding axle breather tube to filler tube (Fig 5).
![Image]()
Fig 4. Remove 8 screws holding fuel bezel to body and tank filler tube.
![Image]()
Fig 5. Cut zip tie holding vent hose to fuel filler tubes.
Disconnect wiring harness, fuel line, and evap line from gas tank (Fig 6). Wiring harness plug - slide red clip down, then squeeze button on chassis-side of the connector and unplug. Fuel line - squeeze ears together and gently work fuel line connector apart. Evap line - simply twist off the rubber hose.
![Image]()
Fig 6. Make necessary disconnections to fuel, wiring harness, and evap lines.
Tank Removal:
Support gas tank/skid with a floor jack. Remove the 7 skid plate nuts (3 front, 4 rear). Gently and slowly lower gas tank/skid. It may help to tilt tank to the passenger side to slip out the fuel filler tubes on the driver's side. Unbolt the straps and lift the plastic fuel tank from steel skid plate. Clean out any dirt that accumulated in the skid.
[ continued ]
.
.
Jeep Gas Skid Modification
CONTENTS
1) Vehicle Setup
2) Peformance Review
3) Modification Write-up
1) VEHICLE SETUP
A 1" body lift needs to be install prior to this modification
2) PERFORMANCE REVIEW
The stock HD skid plates found on some TJ Jeeps provide sufficient strength for general trail riding with the thicker steel, full coverage on 5 sides, and reinforcing ribbing. But it hangs down a fair amount (Fig 1). By utilizing the gap created between the chassis and body created with the installation of a 1" body lift, the stock gas tank and skid can be tucked up for increased ground clearance for essentially free. This improves the departure angle and reduces the number of times the tail end scrapes coming off a ledge or over a rock.
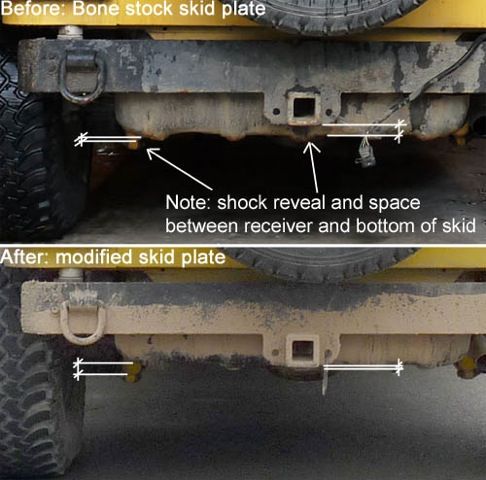
Fig 1. Stock gas tank skid plate hangs a bit low vs. after the mod
3) MODIFICATION WRITE-UP
Preparation:
The fist step is to make sure there is very little fuel in the fuel tank. At 6 lb. per gallon the gas adds up quick and it's a dynamic load that shifts around as you try and get the fuel tank out. So it is best to do this right before you have to refuel your Jeep.
Next, depressurize the fuel system by removing the fuel pump relay (Fig 2) and crank over the engine for a few seconds. Replace the relay and disconnect the ground from the battery for safety. Jack up the rear end and set on jack stand, remove driver's side tire for better access to tank connections (Fig 3 and 6).
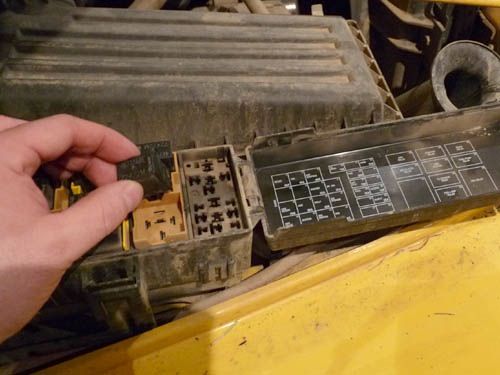
Fig 2. Removing the fuel pump relay from the PDC for fuel system depresurization
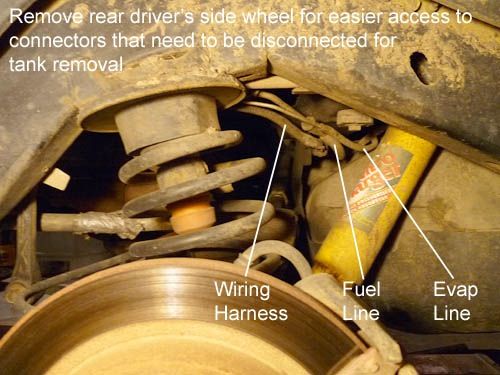
Fig 3. Set rear axle on jacks stand, remove driver's side tire for better access to tank
Disconnecting Fuel Tank:
Remove 8 screws securing filler cap bezel to body and filler tube. Replace gas cap to keep dirt out of filler tube (Fig 4). Reach into fender cavity and snip zip tie holding axle breather tube to filler tube (Fig 5).
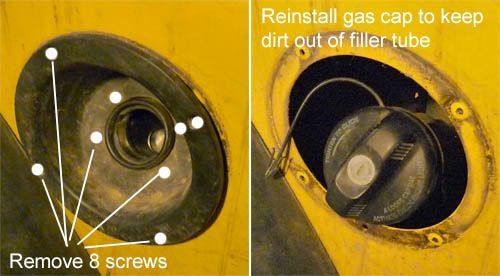
Fig 4. Remove 8 screws holding fuel bezel to body and tank filler tube.
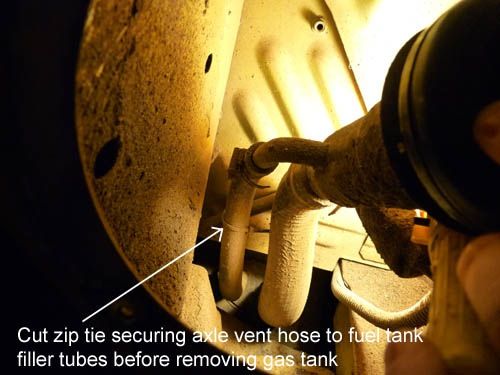
Fig 5. Cut zip tie holding vent hose to fuel filler tubes.
Disconnect wiring harness, fuel line, and evap line from gas tank (Fig 6). Wiring harness plug - slide red clip down, then squeeze button on chassis-side of the connector and unplug. Fuel line - squeeze ears together and gently work fuel line connector apart. Evap line - simply twist off the rubber hose.
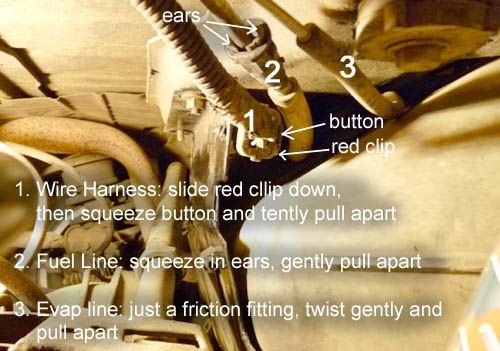
Fig 6. Make necessary disconnections to fuel, wiring harness, and evap lines.
Tank Removal:
Support gas tank/skid with a floor jack. Remove the 7 skid plate nuts (3 front, 4 rear). Gently and slowly lower gas tank/skid. It may help to tilt tank to the passenger side to slip out the fuel filler tubes on the driver's side. Unbolt the straps and lift the plastic fuel tank from steel skid plate. Clean out any dirt that accumulated in the skid.
[ continued ]
.