Jeep Enthusiast Forums banner

Thermal Air Cleaner (TAC) Vacuum

12K views 37 replies 7 participants last post by  STJP  
#1 ·
Folks,

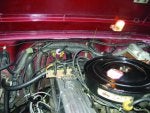
What is the REAL purpose of this gadget (TAC) and is it supposed to have a tiny ball bearing inside the rubber hose line between the Delay Valve and Air Door on the air filter?

I ask because that tiny 4"-5" hose was in need of replacement (dried out/cracked) and when I went to blow through it, I couldn't. When I looked through the small rubber hose line, I noticed it had a tiny little ball bearing that was blocking the air flow. The Jeep has been running real good with it but maybe it wasn't?

Anyway, I replaced the small rubber hose line and kept the ball bearing OUT. It seems to be running real good so AM I MISSING SOMETHING HERE? Why would it be there? :confused:
 
#2 ·
It is supposed to suck hot air via a tube from the hole on the bottom of the snout to a heat stove on the exhaust manifold. This prevents the carb from turning to a block of ice on humid cold days.

Normally when I see a ball bearing in the line, it implies the diaphragm in the valve is blown.
 
#3 ·
Thanks Mike,

Which diaphragm and which valve? The plastic "Delay" one or the actual "Door" unit on the air cleaner? Am I doing potential harm by removing that little bearing and is the diaphragm repairable? Does it need oil, grease or a good cleaning inside? Can the "Delay" be cleaned out with carb cleaner?
 
#5 ·
Sounds like a PO syndrome where the ball bearing was put in the hose intentionally. Back vacuum motor keeps flap closed anytime the engine is off and there is no vacuum present. This keeps creatures like mice from entering your air cleaner.

The front vacuum motor is thermally activated that will divert warm air from the exhaust manifold into the air cleaner. But once the engine is warm enough, a thermal switch allows vacuum to open that vacuum motor so the flap goes down and allows incoming air to funnel through the air cleaner.

There are no ball bearing restrictions in the vacuum hoses, only the delay valves that control vacuum to slowly open or close the vacuum motors. And no, the vacuum motors are not repairable and almost impossible to find replacements for.


#7 ·
Keith, one more question OFF TOPIC?

At the top of the firewall right behind the valve cover, there is a rectangular black plastic housing holding piece. Inside it has a small logic board which can be removed; about 1 1/2" x 1' with multiply transistors on it. What is this exactly for and what does it serve to do?

I ask because I re-routed all the wires and harnesses and did some much needed cleaning of most all those terminals and such. Inside this little box was that logic board and it was FILTHY with smut, webs and dust. I cleaned it thoroughly and made all the contact points fresh. Just curious!
 
#6 ·
Okay, thanks for the much needed knowledge. :)

I will look further into all the lines and the functioning air cleaner parts to make sure they are adequate. I'm not sure what to be looking for if it had the bearing in place and it is now removed.
I will also replace any given rubber hoses that are in need of a new one. I guess it wouldn't hurt to clean all the air cleaner components as well to ensure they are not clogged in any way.

Again, THANKS!

BTW, I am learning everyday how much the P.O. was not mechanically inclined. So much I have repaired with a little incentive and elbow grease. :D
 
#9 ·
Hmm, I know of vacuum solenoids mounted at the rear of the valve cover but nothing on the firewall that has a board.
Vacuum switches perhaps?

I'll have to check my OEM electrical print but really don't recall ever seeing a board mounted there.
 
#23 ·
I am collecting parts to refurbish the air filter system and wonder if any of these would work? I am clueless as I have not removed any vac motors on the filter snout as yet. This site also has delay valves.

http://ecatalog.smpcorp.com/STD/#/searchparts/searchText/vacuum motor?type=p&search=s

STJP
Thanks, the site worked well for me. It has the OEM valves; especially the yellow and white ones. Nice find!

This weekend I will be removing the air cleaner motors from their rivets and going through them thoroughly to get them cleaned and functioning better then they must be at the moment.
I will simply rivet them back into place once I am done. Like many on here, my "TO DO" list keeps growing, lol. When all is said and done, at the end of the day, you got to love it!
 
#21 ·
Yeah I don't know what the deal is. Make one more try.

Go here and enter vacuum motor in the ecatalog search box.

http://www.standardbrand.com/en/

If that does not work later I will print some pages, scan and post as jpegs.
The motors look promising and the delay vales "look" like OEM ones I've seen on you gorgeous air filter assembly.

BTW I've been seriously delayed in my work on CJ. But will be back at it soon.
 
#27 ·
Please take pictures if you don't mind.
My jeep was in a small wreck and my battery came out and landed on the vacuum motor. Ever since then it makes a high pitch noise/ vibration. I always wanted to get it fix, but was afraid I would ruin it forever if I opened it up. It sounds like a vibration of some sort.
That vibration may be that gear I mentioned in my latest reply. With the engine running, gently reach under the Air Door Unit lever underneath and move it toward the front of the engine; gently. Then move it toward the back. There is a gear of some sort that I believe engages the door to open and close it when the temperature changes. You will feel it hitting the gear and that causes a vibration noise. It may just be that the lever was push into the wrong position at the bottom lever linkage. Just back it out. You'll know what I mean when you feel for the movements with a gently play on the lever. Good Luck!
 
#26 ·
Air Door

Okay, as requested. Pictures included!

I drilled the Air Door Unit with a 11/64 drill bit. Easy!

I removed the Air Door, blew air through it from a can of compressed air (not air compressor; too powerful), sprayed quite a bit of electrical cleaner and/or carb cleaner (fast evaporating) and let it dry for about 3 minutes. It was DIRTY.
When I filled it with cleaner, I shook it and let the excess drip out completely from the vacuum tube.

From the images, you can see the bottom where the door mechanism attaches. Turns out, you can push the bottom center in; like an accordion. Once I did this, I blew it with more air and tons of dirt came out. I did this till it was blowing clean air. I blew air from the intake vacuum tube and from the bottom when PRESSED IN. Make sure you are getting clean air and keep squeezing it like an accordion as you do this. I used Powder Graphite on the moving lever so as to avoid lock up later down the line from engine heat. I made sure it was moving freely.

When reattaching, I used a factory firewall sheet metal screw which had the lock washers attached to both, screw and nut. I had to drill the holding screw just a little larger. Before you slide it back into place, you need to turn the Air Door Unit clockwise and twist Counter Clockwise into the door lever at bottom; easy.

I have tested her and BAM, that vibration and rattle noise is GONE! Took about 35 minutes. :cheers2:

P.S. I will do the other one tomorrow because there seems to be a GEAR inside it that connects with the Air Door Unit lever.
 

Attachments

#29 ·
I'd put a pump to those motors and see if they hold a vacuum. If not, the diaphragm is shot, and it will cause a vacuum leak.

Also, you should check that the diaphragm fully compresses (fully opens the trap door) at around 10"hg of vacuum.

258, I don't recall any gear on the front vacuum motor. It operates just like the other one, but has a slightly different linkage to the trap door.

Matt
 
#30 ·
I'd put a pump to those motors and see if they hold a vacuum. If not, the diaphragm is shot, and it will cause a vacuum leak.

Also, you should check that the diaphragm fully compresses (fully opens the trap door) at around 10"hg of vacuum.

258, I don't recall any gear on the front vacuum motor. It operates just like the other one, but has a slightly different linkage to the trap door.

Matt
Okay, I will check further into the tightness but it was pretty darn tight and collapsed well.

The reason I mention a gear or a feeling LIKE a gear is that when the engine is running, I can clearly feel a spinning mechanism from the front unit at top of spout at the linkage contacts between those two unit. When I pull the lever away, it stops vibrating and making noise. It seems as if the linkage is mis-aligned inside the Air Filter itself. I almost want to separate the air filter and check out the guts of it all. :nono:

At any rate, I will be removing the front unit tomorrow and cleaning her up. I will look further into everything. The Air Door unit seems well intact when I carefully looked; at best, inside with a light. The rubber around the diaphragm on the inside appeared good. It was sticking from dryness to the bottom parameter which was causing it NOT to open or collapse; possibly moisture stick-age. Kind of like a window or door seal sticks from age. I rubbed a tiny film of oil inside with a Q-Tip. I will check again tomorrow. I am on a mission again, lol.
 
#31 ·
Sounds like you're making good progress. Just make sure they hold a vacuum. Trust me. I hunted for a phantom vacuum leak for a long time before I realized one of my motors was leaking. It still worked to open the trap door, but leaked nonetheless.

I've completely disassembled and refurbished 2 air cleaner assemblies and can tell you there is nothing different about how the front motor operates.

Matt
 

Attachments

#32 ·
Sounds like you're making good progress. Just make sure they hold a vacuum. Trust me. I hunted for a phantom vacuum leak for a long time before I realized one of my motors was leaking. It still worked to open the trap door, but leaked nonetheless.

I've completely disassembled and refurbished 2 air cleaner assemblies and can tell you there is nothing different about how the front motor operates.

Matt
What is that spinning feeling I am getting?

Also, your filter looks awesome. Mine was all OEM and flawless till I took it to a shop for minor maintenance repairs. Turns out the mechanic chipped mine all up and tried covering it up with cheap spray paint. He took some solver cleaner to clean the over-spray and ruined my OEM decals. Yes, I was livid; to say the least but it was too late. I gave up on it from that point forward.

Looking at yours, a light bulb went on, lol. What brand paint did you use for the black and the silver? Maybe I should send mine to you to have it done. :teehee:

I will look into it tomorrow. My Jeep bucket list just keeps getting longer. AWESOME!