Jeep Enthusiast Forums banner

Jeep WJ Ground Write-up Info

3 reading
218K views 186 replies 65 participants last post by  Uniblurb  
#1 · (Edited by Moderator)
The WJ electronics require good/clean grounds to avoid electronic failure or creating havoc. The purpose of this thread is to pinpoint ground locations along with listing which components connect to each ground. In addition to insulated ground wires, flat ground straps will also be included.

Much of this 'ground' information was gathered from the 2004 WJ FSM (Factory Service Manual). Since just knowing the ground location isn't much help, I went through hundreds of pages of wiring schematics to find which components connect to each ground. And wire color-coding is included with the ground wires when found.

The photos of the specific grounds are from my 04 4.7 Limited. In addition to the 4.7 left-hand-drive, WJ's, the 4.0 grounds will also be included but without photos. There was just too much info to include the right-hand-drive and diesel WJs.

This is a work in progress, and corrections or additions are gladly welcomed. Also, since the WJ's (1999-2004 Grand Cherokee) have over 5 years, the early year WJ's may have different grounding than the later years.

Tools and supplies needed for cleaning grounds.
  • Wrenches and/or sockets for removing ground bolts/nuts.
  • Pliers or vice-grips in case the eyelets are seized or turned.
  • Rust cutter if the bolts/nuts are difficult to loosen/seize.
  • Small wire brush, fine emery cloth, or fine sandpaper.
  • Dremel/rotary tool with wire wheel instead of above if available.
  • Spray electronic cleaner preferred. Some use carb/brake cleaner.
  • Dielectric grease or products like ox-guard. (optional)

Tips on removing and cleaning grounds:
  • Most of the eyelets are solid stainless steel, where they don't have a metal coating. But if you do run into eyelets with tin/zinc coatings, don't remove the eyelet coatings and just rust/corrosion.
  • I did not remove body paint from under the inner fender/firewall mounted grounds since the eyelets have special teeth for going through paint. Reinstall eyelets in the same position as removed.
  • All upper engine compartment grounds have a 10mm headed bolt or nut. The exception is the large/tall ground stud to the right of the plenum, and all bolt/nut head sizes are included in the photos.
  • Note: 'left' & 'right' is indicated as if you're sitting in the driver's seat and not looking at the front. Most everybody already knows this and only mentioning when working from the front.
  • My upper body/engine grounds were all fairly good/clean, but I cleaned them anyhow. The grounds on the side of the engine block and underneath the exhaust were fairly corroded externally due to being in the salt/rust belt.

Ground numbering:
There are approximately 13 ground locations listed, and they're designated by a 'G' followed by a 3-digit number. Many flat ground straps are not even included in the ground location list, but I'll try to include what has been found.

Numeric order will not always be followed in this write-up to group some area grounds together. I've typed in text for electrical components grounded on most diagrams and photos.

I realize I'm way too wordy, sorry, and most ground info can be gathered from the photos & diagrams. Component info is under the ground number/heading anyhow as well as on photos or diagrams.

Below is a chart for on ground numbers with locations. Since the exact locations are unclear additional info in the blue text has been added.

Image


The individual grounds are below, with images following the description.

G100. Near starter (4.0). No info was found, and a photo would help.

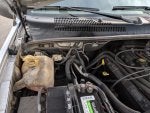
G100. Near intake plenum (4.7).
Conflicting info supplied by the FSM and needs to be verified.
For now, the large/tall stud to the right of the intake/plenum will be designated as G100. This insulated ground strap is connected between the large stud to the backside of the PCM case on one of the left bolts/nuts. I thought this ground was attached to the firewall behind PCM, but it is not and is just on the back of the PCM case.

The OE number is 56038590 for this strap is, but not sure if available. This is the only rubber insulated half-flat ground strap found. The airbox on top of the plenum needs to be removed to clean this ground well.

Image

------------------------------------------------------------------

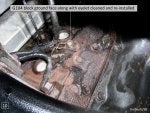
Firewall ground to right/left rear coil-on-plug studs:
This flat braided metal ground strap connects to a firewall stud above PCM and goes to far back passenger side coil-on-plug stud/nut. This is a 'Y' strap eyelet on the right rear coil-on-plug stud. While one strap connects from the firewall the other strap goes over top of the transmission bell housing and connects to the rear far back driver's side coil-on-plug stud/nut. Again, air box on top of plenum needs removed to reach these far back grounds.

Image


Image

---------------------------------------------------------------------

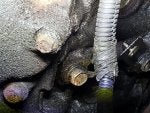
G101. Right inner fender, far forward (4.0 & 4.7)
Large black 6-gauge ground cable direct from battery negative terminal. Real poor design on my 04 since I couldn't back the bolt all the way out since the head was jammed against the PDC case. I cleaned the front/back of eyelet and bolt threads with small wire brush with bolt tip still in place. I've noticed on other WJ's a hole further forward used for this ground which makes more sense since PDC wouldn't be in the way.

Image

-
Image
 
#2 ·
WJ ground write-up continued.

G108. Right side inner fender next to PDC. (3 bk wires, 2 eyelets)
All right front lighting/lamps including fog, electric speed control servo, BCM, coolant level sensor, trans control relay in PDC & TCM (4.7), hydraulic cooling module (4.7), radiator fan motor low/high speed relay (4.0), horns & horn relay in PDC,

Image

------------------------------------------------------

G106 & G107. Left inner fender with both connected by one bolt.

G106. All left front lighting/lamps including fog, right multi-function switch on steering column (black/white wire), wiper motor, front and rear washer pumps,

G107. Antilock brake controller (2 black/orange), only ground.

Image

------------------------------------------------------------------

G102. (4.7) Right side engine block directly to rear of motor mount.
PCM ground (2 black/white) to #31 in C1 black PCM connector.
TCM to speed sensor, line pressure sensor (trans).
Data link connector.

G103. (4.7) Right side engine block to rear of G102 next to mount.
PCM ground (black/tan) to #32 in C1 black PCM connector.
(above PCM grounds are critical to be good/clean)
Black 6-gauge ground wire direct from battery negative terminal.
Black/green: (Bus communications) data link connector, BCM, TCM (4.7), instrument cluster.

* Edit/correction: Until I edit this info go by the below photo link for wire color codes and function for G102 & G103. On my 04 4.7 G103 is a double eyelet with both PCM grounds or one side of it and the data link connector on the other eyelet connection. G103 still has the battery neg cable attached to it. On G102 on my 04 4.7 both sides of the double eyelet are for the TCM only with the line pressure sensor sensor spliced into one of the 4 wires.
https://www.jeepforum.com/forum/attachments/f310/3603882d1516701554-jeep-wj-ground-write-up-info-4.-wj-right-side-engine-harness-pulled-out-front-showing-eyelets-04-4.7-750x560.jpg

Image

------------------------------------------------------------------

G103. (4.0L) Right engine block to rear of motor mount.
(see components connected on diagram)

G104. (4.0L) Right rear of engine block.
This ground appears to be near the transmission dipstick tube and see below figure.

Image

--------------------------------------------------------------------

G104
. (4.7L) Left side of engine block. (2 black wires, 1 eyelet)
A/C compressor clutch, 1/1 and 1/2 downstream oxygen sensors.

The below diagram shows this ground below the oil filter & oil pressure switch. This is incorrect on my 04 4.7. It's in the middle of the left side block, to rear of motor mount, and just 1" below one of the middle freeze-out plugs. Left body (not axle) needs to be jacked up to reach this ground from the underneath front.

Image

---------------------------------------------------------------------

G200. Cabin console left of shifter assembly.
Ignition switch to BCM, sentry key immobilizer module, left multifunction switch on steering column (turn signals, hazards, bright lights), left/right heated seat switches, park lamp relay (trailer tow), interior lighting, shifter, panel lights, instrument cluster, turn indicators on dash, PT 4WD indicator, MTC (manual temp control, heating/cooling), temp valve actuator (MTC blend doors), AZC blower motor/controller, AZC module, front power outlet, cigar lighter.

G201. Cabin console left of shifter assembly.
Airbag control module (black/pink), only ground.

Image

---------------------------------------------------------------

G300. Right of passenger side front seat.
Black wire. Passenger power seat, driver & passenger door module, right rear lamp assembly, radio, amplifier, rear power outlet.

Image

---------------------------------------------------------------

G301. Left of driver side front seat.
Black wire: Fuel pump module, driver's power seat, driver and passenger door module, power windows, liftgate ajar switch, liftgate lock actuator, rear wiper motor, brake lamp switch, overhead console VIC, left rear lamp assembly, high-lamp stop light, license plate light, rear window defroster, sunroof (switch, motor, module), park/neutral switch (4.0), Trans solenoid & TRS assembly (4.7), Auto day/night mirror.

Image


Addition to G301: below is a link to some photos member deeefour posted in post #86 of this write-up showing where G103 attaches to the floor pan hump under the driver's front seat edge on his 04 4.7. Thanks for the photos! https://www.jeepforum.com/forum/f310/jeep-wj-ground-write-up-info-4192594/index6.html#post41024977
----------------------------------------------------------------------
 
#3 ·
Exhaust ground, right side underbody at rear end of 'Y' pipe.
This is a double-strap eyelet with flat ground straps with a bolt connection to the body. One of the straps attaches to the closest stud on the exhaust clamp under the nut. The other strap from body connects to the exhaust hanger bracket lower bolt/nut which is connected to the rear of the transmission.

As can be seen in the 3 below photos my exhaust clamp ground was worthless. Made a shorter ground out of the OE ground strap, used a narrower new ground strap to rear exhaust bracket stud, and installed a new 2.5" exhaust clamp.

Image

--
Image

--
Image


Image


---------------------------------------------------------------

End of ground descriptions and images.

Abbreviations:
AZC: Auto Zone Control (AC/heating system)
BCM: Body Control Module
PCM. Powertrain Control Module (computer)
PDC: Power Distribution Center (fuse/relay box in engine compartment)
TCM: Transmission Control Module (4.7)
TRS: Transmission Range Sensor (4.7)
VIC: Vehicle Information Center
------------------------------------

I have not cleaned my engine block grounds yet and will be including more photos/info. Hope to tackle these real soon but wanted to get this write-up done for now.

Know I haven't covered all the grounds including those on the dash area and doors. Again, additional info, corrections, and photos are gladly accepted.

Sorry for the length but hope this WJ ground write-up helps.
Good luck, Uni
-------------------------------------------------------------------------------
Edit/addition: I finally cleaned my 04 4.7 WJ engine block grounds and thought I'd pass on some info/tips. The grounds were fairly rusted and needed cleaned. Luckily they weren't coated with oil which also makes for a poor ground.

Tools needed:
- Floor jack or regular jack with jack-stand(s).
(with lift installed you may not need the above)
- Ratchet with 3" extension and 15mm socket.
- Small wire brush and various grits of emery cloth.
- Rotary tool if you have one with different tips.
( I used my Dremel w/small wire wheel & barrel sander).
- Spray rust cutter, brake cleaner, electronic contact cleaner.
- Safety glasses are a must with rubber gloves optional.

First thing is disconnect the negative battery cable, set the parking brake, and block the rear tires. Then I used a floor jack with wooden block on top and jacked it up on the right side far front unibody/frame just behind the right front tire. Had it jacked up just until the right-side front tire was still touching the ground. Placed a jack-stand behind the floor jack which was also on the frame. Lifting up just the right-side body also created enough room to work on the left/driver's side block ground.

Without a doubt it's easiest to go straight in under the front to reach the 3 block grounds. You'll just have to switch sides with the axle pumpkin being in the way. Not much fun working on your back or side but only way I could reach these grounds.

I sprayed PB blaster on all 3 grounds and thought they'd be a bear to get off as rusty as they were. I actually used a 3/8"drive breaker bar with short 15mm socket to break loose the right-rear G103 bolt and the left side G104 bolt. These ground bolts weren't all that tight and once broken loose a couple turns I could unscrew them with my fingers.
The G102 bolt right behind the right-side motor mount was a different story. You have to use a 3" extension to get on this bolt and it was real tight. Finally, when I was able to break it loose it came out hard all the way. It almost appeared it had a gray thread-locker on the bolt threads but don't believe they'd want to do this in creating a good ground.

The 3 double-wire eyelets, along with battery negative cable eyelet, are all solid stainless steel so they shouldn't be that hard to clean w/small wire brush and some fine emery cloth. But since there are 4 eyelets, and 3 engine block grounding surfaces, I cleaned everything up with my Dremel with small wire-wheel.

It turned out all I did on the block ground surfaces was polish the rust. It's difficult to reach up in there and some real course emery cloth wasn't taking the rust off easily. Finally I put a course barrel sander tip on my Dremel and that rust dust was flying everywhere! Since I was at an angle I had to pull the barrel sander drum further off the front of the rubber holder to have the edge of it sand. I'm sure you can do all this by hand if you're willing to use some 'elbow grease'.

Enough of my wordiness and below are photos with text, labels and explanations. Again, I used the ground wire color-coding I found and cross-referenced it to schematics to match. I'm going to have to change some of my previous text on the diagrams of G102 and G103 on the left-side engine block.

One surprising thing is all 4 wires on the G102 eyelet behind the right-side motor mount go directly to the TCM (Transmission Control Module). And again, make sure G103, to the rear of G102 is good/clean. There's 2 PCM ground wires on G103 and wouldn't doubt those replacing PCM's may be due to a bad ground. I for one had a bad PCM ground take out 2 PCM's and 2 crank sensors to boot on my other Jeep before I found out what the problem was.

Here's the photos, hope I can squeeze all this in, and good luck!
 

Attachments

#5 ·
Amazing. Added to the FAQ!

Thanks for taking the time to do this!
 
#6 ·
AWESOME WRITE-UP BUD!! Will be referencing all this info in the very near future. I have a few that I know need to be replaced. And will go over and clean all the remaining grounds.
But seriously, thanks for all the time and research you have into this!! Feel like we should pay you!!...lol

@ChrisHager maybe this should be "stickied"

Edit** Chris is faster then me....lol
 
#7 ·
Thanks guys, appreciate it! Also thanks Chris for adding it to the FAQ's.

Luckily I'm an insomniac so worked on this during many wee hours. Lol. And it didn't help there was a huge thunderstorm while posting which thought for sure would take out my internet.

I'll add some more once I hit the block grounds.

PS. thanks Ghost for not posting until I was done. I saw you liked it after the 1st post out of 3! Ha!
 
#149 ·
Thanks guys, appreciate it! Also thanks Chris for adding it to the FAQ's. Luckily I'm an insomniac so worked on this during many wee hours. Lol. And it didn't help there was a huge thunderstorm while posting which thought for sure would take out my internet. I'll add some more once I hit the block grounds. PS. thanks Ghost for not posting until I was done. I saw you liked it after the 1st post out of 3! Ha!
quick question which 1 isit for the central lockingand windows please bud If u can email it to me that would be perfect Mathewharper90@gmail.com
 
#8 ·
@Uniblurb right on brotha! Was waiting til you finished. Once you get the rest up, have Chris delete all the comments between...lol
Keep the informational stuff together.
But again......awesome job!!
:cheers2::2thumbsup::cheers2:
 
#9 ·
Yeah Ghost, I probably shouldn't have crammed 8 photos w/info into the middle section in case I add the block ground photos I'm going to take where they belong.

But with only 3 photos in the last section I can always do an edit at the end. Or may just move some of the last images/info in the 2nd section to the 3rd section. If it sounds like I'm burnt out from working on this most the night I am. :D
 
#10 ·
awesome awesome awesome i am trying to find all those ground locations since i have that p1768 ground which keeps tripping my transmission into limp mode due to no ground wow i was tacking pictures of my other 2000 4.7 JGC and my friends to compare to see where i am missing a ground and this solves it in one location, hopefully this can be pinned or made into a "sticky:

please mods keep this as a reference sticky lol
 
#13 ·
Again UNI awesome post i was starting to go back and forth between my neighbor and my other 4.7 WJ to see if i can find the missing or corroded ground straps, i did find the insulated ground on the stub very loose which probably was one of the culprits when i hit bump or pothole was triggering my limp mode for P1768. i need to focus on that circuit the most lol. i may just do what some have done is to run a ground wire straight to the relay i just need to find the write up about it.
 
#14 ·
i think i possibly found the ground wire that actually goes to the socket #85 for the transmission relay, using UniBlurb awesome pictures and diagrams i was able to use another schematic to trace that wire from the harness all the way to where its is supposed to be bolt to the body, it appears that it was actually resting on the ground bolt and when i would drive or any jolt it would momentary disconnect thus possibly losing ground directly to the relay, if this is the case i can i further up on the harness connect it to another grounding point like the other stud on the driver side of the engine block pretty much in the same spot just higher on the engine ?

ground G104 to the socket via harness passed the C102 harness by the firewall it turns black and yellow but from the ground point thru the harness it starts out *** solid black
 

Attachments

#15 ·
Good find Irivera and real nice photos! Is that G104 ground on your 2000 4.7 on the far back passenger side of the block rather than the left/driver's side block like my 04 4.7? If so I'll add that location info to the write-up.

I don't have the 2000 WJ FSM but have the 2001. It shows G104 for the 01 4.7 the same as mine, on the far forward side of driver's block under the oil filter adapter. And as I found it's actually mid-driver's side block on my 04 4.7.

Can't see why you can't run that broken ground wire from harness to the tall/large stud to left of the driver's side of the plenum. And there aren't any other grounds on that stud anyhow.

I was going to wait until I cleaned my G104 on driver's side block to post a photo of it. I couldn't get a very good photo of it a week ago since it's clear back in there but will post it anyhow. I'll likely jack up the driver's side body to get to it. Here's the not-so-good photo of it with bolt half-hidden in the shadow.
 

Attachments

#16 ·
ground strap getting hot

I have a 2004 4.0 and sometimes when I try to start it it has a slow start. Recently though when it had a slow start the ground strap just so happened to melt the vacuum line that controls the air selector. what in the world could cause this? I have a new battery and the cable ends are new and clean. any suggestions?
 

Attachments

#17 ·
When you say "slow start" do you mean it just cranks-n-cranks over or the starter is turning slow? Regardless, believe I'd check/clean the starter connections with the battery disconnected. I'd also look at cleaning any ground back there and it did say in my write-up info G101 should be near the starter on the 4.0. I've been looking for a photo of this where it connects to the 4.0 and it may be the 6-gauge large black cable from the battery negative terminal.

Where exactly does that ground connect to? Is it on the front of the firewall above the PCM then connect to the engine block? If so that type flat ground strap shouldn't get hot at all except right near the engine block from heat of block itself.
 
#18 ·
This is exactly what happened:I turn the key, it tried to turnover but does not do a "full crank" ..then just clicks.. I had to wait about 2 minutes or so for it to start as normal.
Once it started I noticed the defrost was the only thing working, so I knew the strap melted the line..again.

holy crap am I glad you asked for clarification as to where. I went out to the jeep to get better pics and close ups and found that the strap was also burning (melting) a harness that is clipped to the firewall.
The strap goes from the firewall on the passenger side to the rear of the valve cover.
 
#20 ·
Darn, that looks pretty bad and thanks for the photos.

With that ground strap getting that hot you have something with high amps/voltage using it as a ground path. Are you sure it isn't somehow shorted against the coil rail? In one of your photos it almost looks like it's started melting into where the coil pack is.

On that type of negative battery terminal connector I'd make sure you don't have any rubber cable insulation going under that top metal piece with the two 7/16" bolts holding it down. If there is then often it won't clamp down on the bare wires tight.

We know one of those 2 negative battery cables goes to the far front inner passenger fender (G101). I'd follow that 2nd cable and see where it's connected while cleaning it. Again, it may be back near the starter for the 4.0 although on the 4.7 it connects to the passenger side of the block to the rear of the motor mount. Good luck.
 
#21 ·
Again @Uniblurb this write-up was timely! I did my HVAC system over the weekend. All went well....GOT HEAT AGAIN!!
But the morning after leaving for work I noticed that the 2 interior backseat lights stayed on while driving and after parked and Jeep turned off. They are not at full power, just very dim light. I'm thinking maybe that when reinstalling the center console, something is wrong with the G200 found under there near airbag module. What ya think?
 
#22 ·
Congrats on the heat Ghost! That's a good possibility that console ground could be the problem. Especially since the G200 on the console is for some of the interior lighting.

Did you ever remove that ground when removing the plastic console? Maybe the outside console snagged on that ground wire when reinstalling it?

If you removed the dash for HVAC work you may want to check all those connections up under the dash to left of steering column. Know there's a whole lot of connectors up in there and think that may be where the BCM is located. Good luck.
 
#30 ·
Hey Uni, you wouldn't by chance of the lengths of each of the G100's that are located under the hood? Only one I see a length noted on was the ones underneath by the exhaust brackets.
Alot of my grounds are in a "frayed" condition so I'm gonna start going through each of them and replace them. Found a decent place for some really nice ground wires, I just need to know the lengths I need.
Thanks!!
 
#31 ·
Ghost, I made another futile attempt to find those grounds online and in the 04 parts list to no avail.

I'll try to take some measurements tomorrow if I can beat the ice/snow storm. Lol. Would assume you want the flat braided ground strap measurement from the firewall above the PCM connectors to the right rear coil-on-plug stud? Then another measurement from that stud to the driver's side far back coil-on-plug stud?

Is your insulated ground from the large stud next to the plenum down to the PCM case still good? That's one I've never been able to find a record of even though it has an OE number (56038590AA) on it.
 
#32 ·
there's a few under the hood that aren't in very good condition. The ones attached to the fenders on both sides and the ones in the rear of the engine compartment. I was looking at replacing them with these.....
Taylor Ground Wires
 
#33 ·
Those do look like some real high quality/HD ground straps Ghost. But not sure what you'd use them for unless you wanted to run an extra ground from the engine block to the body/chassis?

With those Taylor straps being 4-gauge (.2043"/5.189mm dia) they're even larger than the 6-gauge (.1620"/4.115mm dia) OE negative battery cables.

I measured some of the cable lengths in the rain today. While not exact the measurements should be sufficient if replacing cables/straps as follows:

- G101, far forward inner right fender, 6-gauge negative battery cable is 30" long as currently routed from fender to negative battery terminal.
- Negative battery terminal cable (6-gauge) down to right side engine block is 32"-36" long.
Note: both above cables are part of the negative battery harness wired directly into the negative terminal/connector.

- Flat braided ground strap from firewall above PCM connectors to right rear coil-on-plug stud is 14" long.
- Flat braided ground strap from above right rear side rear coil-on-plug to left rear coil-on-plug stud is 14-16" long.

While maybe not the highest quality 2 of the below Dorman 15" ground straps to replace the above straps should work fine.

https://www.amazon.com/Dorman-HELP-60213-Ground-Straps/dp/B000CO968G/ref=pd_sim_263_3?_encoding=UTF8&pd_rd_i=B000CO968G&pd_rd_r=9RDX9KRQ0CE7245K3J9Q&pd_rd_w=A1Mb2&pd_rd_wg=YCQRk&psc=1&refRID=9RDX9KRQ0CE7245K3J9Q

Most local parts stores carry these and a washer may be needed on the larger hole end connector since the current holes are only about 1/4" ID.

- Insulated ground strap from large stud (7/16" dia) next to plenium down to back lower corner of PCM case is 16" long.

Not sure what to tell you Ghost on all the other inner fender grounds (G108 right rear fender, G106-G107 left middle fender) since they're fairly small insulated wires which feed into the harnesses with end destinations and/or splices unknown. You could solder on new connectors/additional wire if they don't look good but the stainless steel OE connectors seem like they're real good ones. Good luck.