Jeep Enthusiast Forums banner

Weber Carb Install / Return Spring

30K views 56 replies 12 participants last post by  Ken4444  
#1 ·
The more I get into this install the less I like the Carb.

Their technical support is not very helpful.

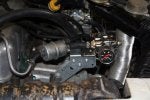
The current problem I am having is the return spring. In step 14 they state Connect the original throttle return spring to the bracket and the lower lever on the Weber carburetor.

If I do that the spring just hangs there limply.

I went through Keith460 build and noticed that he put the spring on the linkage rod form the carburetor to the stock cable bracket. I tried that and it still does not return the carburetor to idle.

This is a new out of the box Weber. The throttle linkage on the carburetor with nothing attached seems stiff to me, not binding but takes more effort than I would expect (compared to a Holley).

Technical support says go to an auto parts store and buy more springs.
What do you say?

In the directions they talk about over tightening the throttle shaft nut. This was installed at the factory. There is visible play of the throttle shaft lever; I do not believe the nut was over tightened. I did lightly tap on the end of the shaft to “re-centralize” the throttle plate.

Based on all the posts I’m seeing on Weber carburetors they seem to be very finicky and touchy and require a lot of set up
 

Attachments

#2 ·
Don't get pissed at the carb, at least not yet ;)

This kind of stuff happens all of the time when we adapt things to fit other things that were never designed to fit in the first place. It's a great carb, the linkage and adaptors can be a real PITA though.

I love what Keith came up with. It's super clean and seems to work really well.

I went the hillbilly route. I flipped the original spring bracket around, bolted it to the rear EGR bolt and hung my spring off of it. Then drilled a small hole in the original linkage (I can't think of what it's called at the moment) at the level that gave me the spring tension that I wanted and attached the spring.

Image


Like you were saying, I didn't like the angle of the arm or how the spring attached to the bolt so I did my own thing.

Hope it helps
 
#3 ·
I'll try it. I took the linkage apart on the carb. Put drops of oil on all the friction points and a dab of grease on the accelerator pump cam. This seems to have helped the stiffness.

I'm finding the hime joints that came with the card are pretty stiff. Any ideas on how to loosen them up? I'm thinking of getting rid of them and using the old ball joints that were on the old carb linkage
 
#4 ·
If I run the spring this way it returns the carb to idle. Has a little mor spring than what I need and the pedal is not require to much pressure (more than what I would want though). I'll try adding a little length to the span of the spring. Thanks for the idea swatson454
 

Attachments

#5 ·
Glenn, I wound up doing what Swatson did for the return spring. The original setup I did with the return spring attached to link rod proved not pull the carb linkage to the idle position from time to time. Found this out after setting the idle speed screw several times using a 02 fuel/air ratio meter to dial in the setting.
So, I dug through my parts bin and found my old OEM spring bracket and after powder coating it, I mounted it on the right side EGR valve mounting bolt. Not like what Swatons did but rather a mirror image. It lines up with the Weber lever arm and points downward. I also had to move the link arm of the throttle to the other side of the bell crank in order to clear the new location of the spring bracket and brake booster.
I also used one of the OEM springs plus another one in the inside that I got from the hardware store.

I have a picture on my camera but I am currently traveling on business so it is not available at the moment.
 
#6 ·
Glenn, I wound up doing what Swatson did for the return spring. The original setup I did with the return spring attached to link rod proved not pull the carb linkage to the idle position from time to time. Found this out after setting the idle speed screw several times using a 02 fuel/air ratio meter to dial in the setting.
So, I dug through my parts bin and found my old OEM spring bracket and after powder coating it, I mounted it on the right side EGR valve mounting bolt. Not like what Swatons did but rather a mirror image. It lines up with the Weber lever arm and points downward. I also had to move the link arm of the throttle to the other side of the bell crank in order to clear the new location of the spring bracket and brake booster.
I also used one of the OEM springs plus another one in the inside that I got from the hardware store.

I have a picture on my camera but I am currently traveling on business so it is not available at the moment.
When you get home and have time I would like to see the picture. I do still have mo original bracket. Thanks
 
#8 ·
GlennLever said:
When you get home and have time I would like to see the picture. I do still have mo original bracket. Thanks
I'll even give you the spring number I purchased from Ace Hardware if you need. It was important to me not to make the tension to tight were it would fatigue my right foot while driving but still bring the Weber to the correct idle position.
 
#9 ·
Thanks, I do not think I need the spring number, but the picture of what you did would be nice.

I made up some extenders for the spring and the tension is about right with the center one.

Now what I have to do is figure out how to add the backup spring so that if the first one breaks the second one will return the carb to idle (NHRA rule to have two so there are no run aways).

I'll drill the hole in the throttle cable bracket to move the spring off the linkage.

All morning on a carb return spring!
 

Attachments

#10 ·
You could also trim the hook end of the springs and then rebend another hook shape into it with pliers to shorten the spring, ive done this when I couldn't get a spring or need to attach it to a shorter point on the linkage. If you just trim it enough it'll have a nice soft smooth return, too much and it'll require to much foot pressure.
I like mine where I can just rest the weight of my foot and leg on the pedal at highway speeds for a poor mans cruise control:)
 
#13 ·
#15 ·
Well after a long and flustrating day I believe I have the return spring set up and the vacuum hoses run correctly.

I now need to go back and put clamps on everthing and redue the hoses on the air cleaner. The PO put the yellow vacuum lines on.

I also need to put the brass fitting on th eintake under the carb back on to supply vacuum to the air cleanner.

Tomorrow I will go out abd get the heat riser tube and it will be done.
 

Attachments

#16 ·
Hey Glenn,

The engine (or is it motor? I always forget ;)) is looking great!

Not to nitpick, but you should consider moving your gas filter and hose to the other inlet side of the carb, so the filter is not sitting directly on the manifold. And the filter should be at approximately the same height as the carb inlet to prevent gas back flow when you shut it down.

Matt
 
#18 ·
Hey Glenn,

The engine (or is it motor? I always forget ;)) is looking great!

Not to nitpick, but you should consider moving your gas filter and hose to the other inlet side of the carb, so the filter is not sitting directly on the manifold. And the filter should be at approximately the same height as the carb inlet to prevent gas back flow when you shut it down.

Matt
Electric motor, gas engine.

The picture is deceiving.

I used the stock fuel line, but bent it up so that the filter is above the manifold by several inches.

It is below the inlet.

I would have thought the float valve in the carb would prevent gas from flowing back to the filter. The valve is at the top of the bowel so it should develop an air gap and break the siphon effect.

Have you found this not to be true?
 
#20 ·
Glenn,

My engine/motor comment was a tongue-in-cheek reference to the "Stupid" thread.

Your pictures must be deceiving because it doesn't look like there's no more than about 1" of separation between the filter and manifold.

Regarding the filter height, that was a suggestion made to me by a member who I consider one of the true Weber "gurus" around here. Below is a pic of how I mounted mine.

Also, the throttle linkages in my Weber kit were also rather sticky, like the ball bearing ends were pressed too tight, or something. I tried lubricating them, which would help for a while, then they'd start sticking again. Finally, I realized I could make the whole mechanism move freely by loosening the lever arm connections arrowed in the second pic. Since it's a locking nut setup, you can do this without fear of it working loose.

Hope this helps.

Matt
 

Attachments

#22 ·
Glenn,

My engine/motor comment was a tongue-in-cheek reference to the "Stupid" thread.

Your pictures must be deceiving because it doesn't look like there's more than about 1" of separation between the filter and manifold.

Regarding the filter height, that was a suggestion made to me by a member who I consider one of the true Weber "gurus" around here. Below is a pic of how I mounted mine.

Also, the throttle linkages in my Weber kit were also rather sticky, like the ball bearing ends were pressed too tight, or something. I tried lubricating them, which would help for a while, then they'd start sticking again. Finally, I realized I could make the whole mechanism move freely by loosening the lever arm connections arrowed in the second pic. Since it's a locking nut setup, you can do this without fear of it working loose.

Hope this helps.

Matt
I think this is where most of the friction in the system is coming from. I was thinking of removing the hime joints and installing ball joints from the originial linkage system. I would cut down the originial linkage rod that was on the Jeep to be the new rod between the carb and the bracket.

There is about a inch of space between the filter and intake. Do I need more?
 
#23 ·
Glenn,

Try loosening the nuts I've pointed to, as well as the one on the other end of the horizontal linkage, before you go to the trouble of replacing the joints. It freed the whole thing up for me, and allowed me to use the small spring and bracket supplied in the kit. Now, mine snaps back to idle easily, and my throttle is buttery smooth.

I think the further you can get the filter away from any high heat source, the better to prevent vapor locks. Also, the return/vent line on the filter should be at 12 o-clock. Yours appears a little cock-eyed, but that could be the angle of the pic.

Matt
 
#24 ·
Glenn,

Try loosening the nuts I've pointed to, as well as the one on the other end of the horizontal linkage, before you go to the trouble of replacing the joints. It freed the whole thing up for me, and allowed me to use the small spring and bracket supplied in the kit. Now, mine snaps back to idle easily, and my throttle is buttery smooth.

I think the further you can get the filter away from any high heat source, the better to prevent vapor locks. Also, the return/vent line on the filter should be at 12 o-clock. Yours appears a little cock-eyed, but that could be the angle of the pic.

Matt
Currently the return is at the 6:00, I will change it.

I have all the pieces to do the mod from the tear down. It is low piroty right now though. I want to get it running and I am thinking it will run this weekend.
 
#25 ·
For those without need to rely on the factory installed throttle control bracket this linkage kit offers smoother throttle movement in that it allows the attachment of the accelerator cable directly to the throttle lever.
A simpler, less troublesome and much cleaner install, eliminating the use of the Weber bell crank as well as that OEM bracket.

In your photos it appears that some improvement in throttle lever pull could be had by attaching the short rod to the center and uppermost hole in the throttle lever, a bit more leverage would occur.

Without seeing a CTO I'm curious how you intend to control the air doors in the OEM air filter housing.

Very nice looking under that hood.
 

Attachments

#26 ·
For those without need to rely on the factory installed throttle control bracket this linkage kit offers smoother throttle movement in that it allows the attachment of the accelerator cable directly to the throttle lever.
A simpler, less troublesome and much cleaner install, eliminating the use of the Weber bell crank as well as that OEM bracket.

In your photos it appears that some improvement in throttle lever pull could be had by attaching the short rod to the center and uppermost hole in the throttle lever, a bit more leverage would occur.

Without seeing a CTO I'm curious how you intend to control the air doors in the OEM air filter housing.

Very nice looking under that hood.
I really like the idea of eliminating all the linkage and hooking the trottle cable right to the carb.

I went to the Redline web site and could not locate the part.

I did a search and came up with these pictures on another thread here.

Image


Looks like they want you to cut the end off the cable???

Image


I do not like that idea.

If I move the linkage so that I get more leverage it will require more pedal travel and I just have enough now to get full throttle to idle now without changing the linkage rods provided. If I do that I think I will try removing the hime joints and replacing them with the ball joints from the original tear down and shorten the linkage rod from the stock setup. I think all the friction is coming from the hime joints. I have torn the carb linkage apart and reassembled. That works fine and returns with just the accelerator spring.

According to the pictures posted by Keith460 the CTO is only needed if you run the EGR valve. The air cleaner gets hooked directly to manifold vacuum.

Correct?
 

Attachments

#27 ·
Both yourself and Keith are right, I've confused ambient temp with engine temp... sorry.

Yes, while mounting the 99007.114 the ball stud end of the cable would need to be cut.
FWIW, my personal favorite is the 99007.116 kit. Less costly yet it requires both the ball stud removal as well as a portion of the cable sheathing. Both kits include the throttle return spring and anchor which fit the application.

A link to either of them. To compare, while on that same page enter the 99007.114 in the search box.
http://www.carburetion.com/Weber/invtocartweber.asp

An adjustment to either the long or short rod would accommodate any change needed to fit that upper hole. The pedal involvement should remain the same with either arrangement.
 
#28 ·
Great to hear the hoses are correct. I just finished clamping everthing.

When I click on the link I get
"Sorry Part Unavailable CALL 1-800-994-2272 "

That's ok, I do not want to cut the cable.
 
#29 ·
Glenn,

I know Keith's vacuum layout is often considered gospel around here, but there are many of us who prefer using manifold vacuum to our distributors, for the improved low-end performance and better cold starts.

If you're willing to try it, I think you'll be pleasantly surprised. I was. Here's the most simple layout I've found thru the help of Mcmud, Swatson454, and several others.

Is there a particular reason you chose not to run the EGR? Just curious.

Matt
 

Attachments

#30 ·
Glenn,

I know Keith's vacuum layout is often considered gospel around here, but there are many of us who prefer using manifold vacuum to our distributors, for the improved low-end performance and better cold starts.

If you're willing to try it, I think you'll be pleasantly surprised. I was. Here's the most simple layout I've found thru the help of Mcmud, Swatson454, and several others.

Is there a particular reason you chose not to run the EGR? Just curious.

Matt
I have your diagram stored in a word doc.

My dragster is plumed with manifold vacuum to the vacuum advance.

I will try it once the Jeep is running down the road.

I got rid of the EGR just for the looks.

I will post pictures later tonight.
 
#32 ·
Ok, pictures, first one is of the new return spring. It is now doubled up so that if one breaks the other will return the throttle. The pedal is a little stiff.
 

Attachments

#37 ·
I think you will be binding the Bellcrank a little bit with the wire hook you made to hold the spring. I was able to get the Bellcrank to pivot easier after taking it off and filing it flat at the ends. Also used some thrust washers between the the hex head of the bolt and nut to eliminate play.

Once I get home I'll submit the photo or photos of my current spring return setup with some measurements and spring numbers. It utilizes the old OEM spring with another spring inside it that is light duty but gets the job done.

I can see that your gas pedal would be a little stiff and your ankle joint may start to hurt after driving it around awhile.
 
#44 ·
question...how are the fuel inlets to the carb secured? I run the 38 as well, but my fuel inlet is coming off the right side vs. the left like Glenn's. I'm not entirely sure it screws in or not because the right side has more of a brass plug/cap type that has no "head" to it, it's more "shoved in" the actual inlet, it seems.
 
#45 ·
Yours may be different then mine. My plug had a hex head on it for a wrench. Mine were screwed in (both sides).

Be careful removing the plug. The factory did no use any Anti-Seize on the threads and it will want to gall the threads in the carb when you remove it. The gas inlet came right out with no problems
 
#46 ·
Yep, it fits. It is longer then I remember.

Today's task is to make the block off plate for the EGR. The tape I used to powder coat the intake will make a nice template.
 

Attachments