

Hi Guys. Deep into my restoration and refurb, I recently decided to re-wrap my dashboard grab handle (do we also call it an Oh $h!t handle?) in leather. My original Laredo handle still had the old and tired leather from 40+ years ago and it was in bad shape. Many of the stitches were torn and broken as well.
So here is what I did, with instructions on how you can do the same. All-in-all it was pretty easy, and I can't even sew!
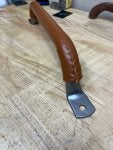
Start with you old handle and get it clean and bare. I repainted mine in black to prevent future rust, but I wanted the visible ends to be silver to match my dash chrome better. I used Seymore Stainless Steel in a rattle can just on the ends.
![Image]()
Next, order a Belinous Leather Steering wheel leather kit from Amazon. They have many sizes and colors. My Laredo had Nutmeg PLeather and I went with the Brown as I felt it was the closest match. Size M2 if you intend to wrap your handle with minimal or no additional padding.
Here's the link.

![Image]()
![Image]()
Next you'll need some padded double sided tape. The padding is nice under the finished piece, but you could probably use non-padded tape too. The main objective here is to prevent the final piece of leather from twisting and such on the handle. The tape is needed for that.
![Image]()
Next you'll want to build a rig for the handle and start watching YouTube videos on sewing leather handles. I noticed while watching many videos that just about all the guys on there had some method of keeping the thing you are wrapping stationary, while you sew. That seemed to make sense to me (and later I found this to be incredibly helpful to a better finished result). I grabbed a 2x4, drilled some holes corresponding to the handle, and bolted it down. Then it's easy to clamp that whole thing to the bench.
![Image]()
When your leather kit arrives, open it up and cut the provided stitching. Remember, this is for a steering wheel, so it's a big leather circle/hoop. Cut the stitching, then cut a strip of leather at 17.5 inches.
![Image]()
![Image]()
Next, plan out the placement of the leather. With a 17.5" strip, I planned for about 3.5 inches of under-fold on each end. I think it looks better to fold the end under versus seeing a raw edge. When you underfold, there will be some bunching of material. I ended up cutting off some "dog-ears" and later even came back and cut off a little more dog-ear, more than shown.
![Image]()
![Image]()
Next, decide on your tape placement. I decided to go on the backside as I didn't want the tape where the stitches would be, and I opted for a "sleeker" look with less softness to the final product. If you go with more tape than this, you would definitely need to go up a size on the leather width to allow for that greater circumference.
My original leather-wrapped handle also had issues with the glove box door rubbing on it when opening and closing. Not sure if this is common. That was another reason I went for less padding under the leather. YMMV.
![Image]()
So here is what I did, with instructions on how you can do the same. All-in-all it was pretty easy, and I can't even sew!
Start with you old handle and get it clean and bare. I repainted mine in black to prevent future rust, but I wanted the visible ends to be silver to match my dash chrome better. I used Seymore Stainless Steel in a rattle can just on the ends.
Next, order a Belinous Leather Steering wheel leather kit from Amazon. They have many sizes and colors. My Laredo had Nutmeg PLeather and I went with the Brown as I felt it was the closest match. Size M2 if you intend to wrap your handle with minimal or no additional padding.
Here's the link.
Amazon.com: BELINOUS Leather Steering Wheel Cover Lace Up, Stitch On Wrap, Universal Fit 13-20 inch Car Truck SUV Pickup Boat, A Whole Piece of Cowhide, DIY Stitch w/Needle Thread (Size M4, Brown) : Automotive
Buy BELINOUS Leather Steering Wheel Cover Lace Up, Stitch On Wrap, Universal Fit 13-20 inch Car Truck SUV Pickup Boat, A Whole Piece of Cowhide, DIY Stitch w/Needle Thread (Size M4, Brown): Steering Covers - Amazon.com ✓ FREE DELIVERY possible on eligible purchases
www.amazon.com
Next you'll need some padded double sided tape. The padding is nice under the finished piece, but you could probably use non-padded tape too. The main objective here is to prevent the final piece of leather from twisting and such on the handle. The tape is needed for that.
Next you'll want to build a rig for the handle and start watching YouTube videos on sewing leather handles. I noticed while watching many videos that just about all the guys on there had some method of keeping the thing you are wrapping stationary, while you sew. That seemed to make sense to me (and later I found this to be incredibly helpful to a better finished result). I grabbed a 2x4, drilled some holes corresponding to the handle, and bolted it down. Then it's easy to clamp that whole thing to the bench.
When your leather kit arrives, open it up and cut the provided stitching. Remember, this is for a steering wheel, so it's a big leather circle/hoop. Cut the stitching, then cut a strip of leather at 17.5 inches.
Next, plan out the placement of the leather. With a 17.5" strip, I planned for about 3.5 inches of under-fold on each end. I think it looks better to fold the end under versus seeing a raw edge. When you underfold, there will be some bunching of material. I ended up cutting off some "dog-ears" and later even came back and cut off a little more dog-ear, more than shown.
Next, decide on your tape placement. I decided to go on the backside as I didn't want the tape where the stitches would be, and I opted for a "sleeker" look with less softness to the final product. If you go with more tape than this, you would definitely need to go up a size on the leather width to allow for that greater circumference.
My original leather-wrapped handle also had issues with the glove box door rubbing on it when opening and closing. Not sure if this is common. That was another reason I went for less padding under the leather. YMMV.
")


