

***********HEADERS ON A JEEP!*********** ***********HEADERS ON A JEEP!*********** ***********HEADERS ON A JEEP!*********** ***********HEADERS ON A JEEP!***********
Hello, all! I decided to install Doug Thorley Stainless Steel Silver Ceramic Coated shortie headers on my 4.0L Grand Cherokee with California Emissions to complete the full exhaust phase of my project Jeep, which I call "Just a Jeep" This will be an install explanation as well as my thoughts, so it is very much a product review as well. I previously installed a Flowmaster Super 40 muffler and new tail piping, so I figured it was time to replace the rusted manifold, catalytic converters, and piping as well as the 02 sensors. I did have a few 02 sensor trouble codes so I figured this would remedy that. After clearing them with my Hypertech 52500 tuner, 1 code: PO141. Not sure why after I cleared it 2 more times - I will update this area once I know why. It has been 3 weeks since finishing this build and besides that code and the driveshaft hitting the cat piping, everything has been excellent. Will explain more below.
***Here is my YouTube channel and Instagram: JustaJeep04 Please check them out, I try to update them with everything I do but I primarily use Instagram. I'm just a college kid who loves Jeeps. Please email me at bmsch989898 @ gmail.com
Warning:
You will need to modify exhaust piping to accommodate Doug Thorley headers. It is also recommended to unbolt, cut, and completely remove the cat piping from the vehicle otherwise, there is NO access to lower manifold bolts. Do NOT heat wrap over ceramic coated headers, it will ruin them and not work at heat reduction at all. Either one or the other. But if you want the best and for sound and looks, get these headers. Yes, they dramatically reduced engine bay heat. And after very carefully inspecting the headers, any reviews of Doug Thorley about quality are thrown right out the window. They are plain flawless! Gorgeous, in fact. Everything was included except manifold bolts (I just reused my bolts since they were fine). But you can order a Dorman manifold hardware kit if you really want. So what came in the header box? Headers, a gasket (however I used a FelPro gasket from Auto Zone/Advance Auto as well as installing a FelPro throttle body gasket, total $25).
A little background:
Doug Thorley has been around for quite a while, but they had a poor reputation. After reading around I wasn't so convinced I wanted to even do it because they are the only ones who make California Emissions for a 2004 WJ 4.0 that is ceramic coated but had horrible reviews over poor quality and missing parts. Given I was about to spend about $450 on these headers through Amazon (Amazon had the best pricing on ALL parts I used for this build, believe it or not), I emailed Mike from Doug Thorley Headers and straight up asked about some of the poor ratings. He said they have very recently taken charge of all issues from quality and quality control and made sure that the headers are top notch, and are again the best of the best. He asked if I let him know how it went and my thoughts. With Amazon's return policy in mind, I decided okay, why not? I really wanted to go after that coating instead of cheaper, less performance rated headers like Rugged Ridge not because they are bad, but because stainless steel with the ceramic coating is simply the best. Yes, you can wrap them, but you can't wrap over ceramic headers. That's a big no-no and you will ruin them. I wanted that nice polished look and performance, plus sound. Doug Thorley was my only option because they are the only ones that made California Emissions headers. I am in PA but can't exempt from emissions, so that was ruled out.
I am assuming you have slight mechanical knowledge about 4.0 engines, but if you haven't already heard, they are bulletproof. Scrapyards were paid by the government to buy these engines and destroy them, and give you $4,500 for them. Yes, you heard right for just a crate engine. They poured saline in them and ran them, and it took well over a half hour to seize up. The engines do get horrible MPG's, in fact, I get 15 tops even with all my performance mods! Most engines take a few minutes to seize up, but oh no, not these suckers. They are also so wildly popular because of their excellent low range torque and ease to work on.
Parts installed for this build:
Masking tape, cardboard, rags, marker. The standard assortment of mechanic tools. 5 out of 10 for mechanical skill level, and a warm garage to be occupied for up to 2 weeks (should take 4 days for a single person, average speed. But I must include part-runs and worst case scenarios).
1 can of Rustoleum high heat primer to paint intake manifold, 1 can of high heat engine enamel paint to paint intake manifold. Optional.
2 cans of brake cleaner to clean engine and intake manifold. It will be greasy from build up.
1 can of PB blaster. Spray on bolts and exhaust flange bolts as well the hanger. You don't want to break bolts and have to open the backup Dorman bolt pack I talked about.
FelPro exhaust and throttle body gaskets: MS 93094 & FEL-60948
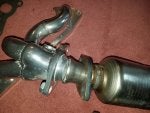
Doug Thorley HDX-635 headers. Warning, header flanges are an inch lower and will not allow connection to cat piping without cutting and welding.
Magnaflow 458053 stainless steel cat piping. Had to heavily modify this system because the header flanges are an inch lower than OEM manifold.
Design Engineering 010378 fuel rail, heat shield, and injector cover kit to reduce heat.
Dorman 03408 Exhaust Flange Hardware Kit - save your OEM bolts and transfer washers over. I did not end up using this at all, all my bolts were okay. But get it, just in case.
02 Sensors:
Special tools you will need:
1/2" socket to loosen bolt tensioner to remove engine belt from power steering assembly
Safety glasses when working under the vehicle - rust will rain down on you every time you touch something! It's a Jeep thing.
5/16" A/C-fuel line disconnect tool to disconnect the fuel line from fuel rail.
Torque wrench to tighten intake/exhaust manifold bolts to 40-foot/pounds.
Saw-Zall with a metal cutting blade to cut OEM cat piping out.
Many various sized socket extensions and tools.
Your average mechanic stuff, nothing fancy for these engines.
Pressure washer to clean intake manifold.
To start, LABEL! Whether you are a hobbyist or mechanic, just label. Use masking tape and label all tubes, wires, and cables. Also, set up a large piece of cardboard on the floor and have a marker. Draw dividing boxes around parts as you set them down and write down how many bolts go to that part. Don't bump this cardboard, or better yet, tape the bolts down. Do whatever works - this is what I did and I can't express how much time I saved from doing this, even though I know where everything goes to. Make sure you put a rag under the disconnect area and be ready to get fumes everywhere. Phew.
Videos:
I am not going to walk through every step. You must know how to disassemble a Jeep engine down to the manifolds in order to do this project. There are videos on intake, throttle body, power steering assembly, de-greasing intake manifolds using pressure washers, intake manifold painting, and injector removal. Memorize them.
Installation:
Once everything is removed and it is just the intake manifold, loosen the upper manifold bolts but do not remove them. Use a Saw-Zall and cut the OEM cat piping off in front of the first exhaust hanger. This should be before the 3rd catalytic converter on the passenger side, which crosses over the main body cross support. Just leave the hanger and piping to the rear of the vehicle on so that way it doesn't move or fall down on your way over to the exhaust shop if you must go. The cat pipes should be hanging by the bolts now. Spray those flange bolts starting a few days prior and they should be very rusted by will break loose. Once all 4 are disconnected, you should be able to drop the cat piping out of the vehicle and get rid of it. Transfer over the 02 sensors if you want. Use copper as anti-seize. If you are installing new 02 sensors, do not add anti-seize if there already is anti-seize on them. Be sure not to touch or get anything including anti-seize on the sensors. The sensors get torqued to about 22 foot/pounds.
Grab a wrench (If I remember it was 15 mm, or a metric wrench around that size) and unloosen and remove all lower manifold bolts. The upper bolts that you loosened but didn't remove will hold things in place. Once all 4 lower bolts and the 2 outer exhaust manifold stud nuts are off, you can climb out from under and work above the Jeep. Remove all bolts except the middle exhaust manifold bolt because that it what holds the exhaust manifold in place. The intake manifold should wiggle right out, however, you will fight an 02 sensor wire harness that is behind the power steering assembly. Twist and angle it out. You can undo the hanger the wire harness attaches to and that will give you all the slack in the world. It does come out, trust me.
Modifications to cat-piping:
Because the Doug Thorley Headers are an inch or so lower than the OEM manifolds, whether you kept the OEM piping or installed new OEM or Magnaflow piping, you will need to cut after the pre-cats (mini-cats) and take off an inch. Mine was hitting the driveshaft at the y-pipe on the exhaust and so I went over to the exhaust shop and had them move it over (thinking it was too close). Only after it hit some more when I left that I turned around and paid extra money to have them shorten it. No big deal – remember, headers are the goal and I can’t stress how awesome they are. Whether you do it yourself or have a shop do it, piping is easy.
If you can cut, do minor bending to a shorter piece of pipe and weld it back in, go for it. I say bending because you can’t just cut the pipes, the don’t go straight down - they have some curve to them so you will have to cut a large section out, bend it, shorten it, and weld it back in. Basically monkey-rig it. The other option (if they weren't already installed, like mine) would be to cut the flanges off at the top, cut the little bit of straight piping above the pre-cats and then weld the flanges back on. The problem is the Magnaflow uses high-flow cats (which means better performance) but the issue is that it takes away from flange lenght by an inch and the piping after the cats is also bent very hard and in a shorter amount of space. OEM and Magnaflow's height from below the y-pipe curve to the top of the rear flange is 19", but the way this is accomplished is different due to the bends, angles, and the lenght of the cat bricks.
Fuel rail heat wrap:
I used Design Engineering’s kit which came with injector wraps (didn’t use), a fuel rail cover, and the small piece of fiberglass that covers the holes between the intake manifold tubes. This kit works on a wide year range of 4.0’s so if you are an older model you can use this, as the cylinder head bolts that this has holes for will line up. The only small issue for my fuel rail wrapping was that my fuel rail has a vent cap that the wrapping didn’t have a pre-cut hole for, so I used a knife and made an ‘x’ and it slipped on. I used scissors to cut the extra strings, as the material’s coating is string-like.
Intake Manifold Painting:
I used Rustoleum’s high heat primer and high heat engine enamel paint. Two coats of primer and two coats of paint. I wanted to do a third coat of paint to make it even smoother but I really wanted to get it back together and I did dump on the paint the first two coats. If I did a third, it would be even smoother looking, but I think it would have been overkill. The paint serves a second purpose besides aesthetics. It will act as a heat shield for the intake manifold, so the air should be cooler. I used up two cans of brake cleaner, metal scrub brushes to work the cleaner in as it soaked for over 10 minutes, and finally, pressure washed it. I did this over six times and used both cans. Don’t torch them like some people say – yes, metal is tough but that type of heat for that long will cause aluminum to expand and that precision is needed!
Manifold(s) Installation:
Do not make the same mistake I did when installing the intake manifold: I didn't seat it correctly. This created vacuum and because it was much more of a leak than a disconnected vacuum tube - my engine red-lined hard. I had to rip it all apart and do it over again and get the FelPro gasket because I made an impression on the first gasket. I'd highly recommend using a FelPro gasket for both exhaust manifold and throttle body and ditch the high heat silicone Doug Thorley wants you to use. In a picture below, you can see why my intake manifold didn't seat right and I didn't catch it. There are two lower gasket studs that are about 0.25" long that guide the gasket - there are also two holes in the intake manifold for those holes, but I didn't think anything of it. Get a smartphone or small camera with a flash, reach under the manifold before you torque the bolts to 40-foot pounds and CHECK! You will need a second set of hands to hold the manifolds in place as another puts in the bolts and finger tightens them to hold everything in place. Make sure everything is lined up. The headers are cut in half for easier installation but make sure the gap between them is even. You'll know what I mean when you do it. The headers do rest on two outer studs but the upper center bolt is that holds them good.
---CONCLUSION READ THIS:
Between the header’s design and ceramic coating, the heat resistant paint on the intake manifold plus the fuel rail wrap – I’d say my engine temps are lower, throttle response and coasting down a road is greatly improved, and maybe some mpg's (not sure yet). Consider that the header’s and Magnaflow piping flow better and allow the engine to work more efficiently which means less fuel used, which means less heat. But above all else – the sound is fantastic on the outside. There is a lot more rumble coming from under the engine and the whole vehicle itself instead of just out the back with just OEM or even only the Flowmaster 40 I had installed previously. It really makes a difference. Again, this a project you do not want to rush on. It will take time and modification. There is some 1500k rpm exhaust drone inside from the muffler but I think it is just right. Everyone has different tastes of interior exhaust sound, but I wouldn't do exhaust for interior sound - it's for exterior sound. And mine is super deep and rumbly, so my mission is accomplished. I painted my manifold to show that "I was in the engine bay and did something major." You will never have the intake manifold out again - so just do it! Also, for older 4.0's that don't have the curved style intake manifold that is found on the last generation of 4.0's ever made - I'd suggest putting that one in to get 20hp. If your intake manifold doesn't look like mine - go find one!
Hello, all! I decided to install Doug Thorley Stainless Steel Silver Ceramic Coated shortie headers on my 4.0L Grand Cherokee with California Emissions to complete the full exhaust phase of my project Jeep, which I call "Just a Jeep" This will be an install explanation as well as my thoughts, so it is very much a product review as well. I previously installed a Flowmaster Super 40 muffler and new tail piping, so I figured it was time to replace the rusted manifold, catalytic converters, and piping as well as the 02 sensors. I did have a few 02 sensor trouble codes so I figured this would remedy that. After clearing them with my Hypertech 52500 tuner, 1 code: PO141. Not sure why after I cleared it 2 more times - I will update this area once I know why. It has been 3 weeks since finishing this build and besides that code and the driveshaft hitting the cat piping, everything has been excellent. Will explain more below.
***Here is my YouTube channel and Instagram: JustaJeep04 Please check them out, I try to update them with everything I do but I primarily use Instagram. I'm just a college kid who loves Jeeps. Please email me at bmsch989898 @ gmail.com
Warning:
You will need to modify exhaust piping to accommodate Doug Thorley headers. It is also recommended to unbolt, cut, and completely remove the cat piping from the vehicle otherwise, there is NO access to lower manifold bolts. Do NOT heat wrap over ceramic coated headers, it will ruin them and not work at heat reduction at all. Either one or the other. But if you want the best and for sound and looks, get these headers. Yes, they dramatically reduced engine bay heat. And after very carefully inspecting the headers, any reviews of Doug Thorley about quality are thrown right out the window. They are plain flawless! Gorgeous, in fact. Everything was included except manifold bolts (I just reused my bolts since they were fine). But you can order a Dorman manifold hardware kit if you really want. So what came in the header box? Headers, a gasket (however I used a FelPro gasket from Auto Zone/Advance Auto as well as installing a FelPro throttle body gasket, total $25).
A little background:
Doug Thorley has been around for quite a while, but they had a poor reputation. After reading around I wasn't so convinced I wanted to even do it because they are the only ones who make California Emissions for a 2004 WJ 4.0 that is ceramic coated but had horrible reviews over poor quality and missing parts. Given I was about to spend about $450 on these headers through Amazon (Amazon had the best pricing on ALL parts I used for this build, believe it or not), I emailed Mike from Doug Thorley Headers and straight up asked about some of the poor ratings. He said they have very recently taken charge of all issues from quality and quality control and made sure that the headers are top notch, and are again the best of the best. He asked if I let him know how it went and my thoughts. With Amazon's return policy in mind, I decided okay, why not? I really wanted to go after that coating instead of cheaper, less performance rated headers like Rugged Ridge not because they are bad, but because stainless steel with the ceramic coating is simply the best. Yes, you can wrap them, but you can't wrap over ceramic headers. That's a big no-no and you will ruin them. I wanted that nice polished look and performance, plus sound. Doug Thorley was my only option because they are the only ones that made California Emissions headers. I am in PA but can't exempt from emissions, so that was ruled out.
I am assuming you have slight mechanical knowledge about 4.0 engines, but if you haven't already heard, they are bulletproof. Scrapyards were paid by the government to buy these engines and destroy them, and give you $4,500 for them. Yes, you heard right for just a crate engine. They poured saline in them and ran them, and it took well over a half hour to seize up. The engines do get horrible MPG's, in fact, I get 15 tops even with all my performance mods! Most engines take a few minutes to seize up, but oh no, not these suckers. They are also so wildly popular because of their excellent low range torque and ease to work on.
Parts installed for this build:
Masking tape, cardboard, rags, marker. The standard assortment of mechanic tools. 5 out of 10 for mechanical skill level, and a warm garage to be occupied for up to 2 weeks (should take 4 days for a single person, average speed. But I must include part-runs and worst case scenarios).
1 can of Rustoleum high heat primer to paint intake manifold, 1 can of high heat engine enamel paint to paint intake manifold. Optional.
2 cans of brake cleaner to clean engine and intake manifold. It will be greasy from build up.
1 can of PB blaster. Spray on bolts and exhaust flange bolts as well the hanger. You don't want to break bolts and have to open the backup Dorman bolt pack I talked about.
FelPro exhaust and throttle body gaskets: MS 93094 & FEL-60948
Doug Thorley HDX-635 headers. Warning, header flanges are an inch lower and will not allow connection to cat piping without cutting and welding.
Magnaflow 458053 stainless steel cat piping. Had to heavily modify this system because the header flanges are an inch lower than OEM manifold.
Design Engineering 010378 fuel rail, heat shield, and injector cover kit to reduce heat.
Dorman 03408 Exhaust Flange Hardware Kit - save your OEM bolts and transfer washers over. I did not end up using this at all, all my bolts were okay. But get it, just in case.
02 Sensors:
Special tools you will need:
1/2" socket to loosen bolt tensioner to remove engine belt from power steering assembly
Safety glasses when working under the vehicle - rust will rain down on you every time you touch something! It's a Jeep thing.
5/16" A/C-fuel line disconnect tool to disconnect the fuel line from fuel rail.
Torque wrench to tighten intake/exhaust manifold bolts to 40-foot/pounds.
Saw-Zall with a metal cutting blade to cut OEM cat piping out.
Many various sized socket extensions and tools.
Your average mechanic stuff, nothing fancy for these engines.
Pressure washer to clean intake manifold.
To start, LABEL! Whether you are a hobbyist or mechanic, just label. Use masking tape and label all tubes, wires, and cables. Also, set up a large piece of cardboard on the floor and have a marker. Draw dividing boxes around parts as you set them down and write down how many bolts go to that part. Don't bump this cardboard, or better yet, tape the bolts down. Do whatever works - this is what I did and I can't express how much time I saved from doing this, even though I know where everything goes to. Make sure you put a rag under the disconnect area and be ready to get fumes everywhere. Phew.
Videos:
I am not going to walk through every step. You must know how to disassemble a Jeep engine down to the manifolds in order to do this project. There are videos on intake, throttle body, power steering assembly, de-greasing intake manifolds using pressure washers, intake manifold painting, and injector removal. Memorize them.
Installation:
Once everything is removed and it is just the intake manifold, loosen the upper manifold bolts but do not remove them. Use a Saw-Zall and cut the OEM cat piping off in front of the first exhaust hanger. This should be before the 3rd catalytic converter on the passenger side, which crosses over the main body cross support. Just leave the hanger and piping to the rear of the vehicle on so that way it doesn't move or fall down on your way over to the exhaust shop if you must go. The cat pipes should be hanging by the bolts now. Spray those flange bolts starting a few days prior and they should be very rusted by will break loose. Once all 4 are disconnected, you should be able to drop the cat piping out of the vehicle and get rid of it. Transfer over the 02 sensors if you want. Use copper as anti-seize. If you are installing new 02 sensors, do not add anti-seize if there already is anti-seize on them. Be sure not to touch or get anything including anti-seize on the sensors. The sensors get torqued to about 22 foot/pounds.
Grab a wrench (If I remember it was 15 mm, or a metric wrench around that size) and unloosen and remove all lower manifold bolts. The upper bolts that you loosened but didn't remove will hold things in place. Once all 4 lower bolts and the 2 outer exhaust manifold stud nuts are off, you can climb out from under and work above the Jeep. Remove all bolts except the middle exhaust manifold bolt because that it what holds the exhaust manifold in place. The intake manifold should wiggle right out, however, you will fight an 02 sensor wire harness that is behind the power steering assembly. Twist and angle it out. You can undo the hanger the wire harness attaches to and that will give you all the slack in the world. It does come out, trust me.
Modifications to cat-piping:
Because the Doug Thorley Headers are an inch or so lower than the OEM manifolds, whether you kept the OEM piping or installed new OEM or Magnaflow piping, you will need to cut after the pre-cats (mini-cats) and take off an inch. Mine was hitting the driveshaft at the y-pipe on the exhaust and so I went over to the exhaust shop and had them move it over (thinking it was too close). Only after it hit some more when I left that I turned around and paid extra money to have them shorten it. No big deal – remember, headers are the goal and I can’t stress how awesome they are. Whether you do it yourself or have a shop do it, piping is easy.
If you can cut, do minor bending to a shorter piece of pipe and weld it back in, go for it. I say bending because you can’t just cut the pipes, the don’t go straight down - they have some curve to them so you will have to cut a large section out, bend it, shorten it, and weld it back in. Basically monkey-rig it. The other option (if they weren't already installed, like mine) would be to cut the flanges off at the top, cut the little bit of straight piping above the pre-cats and then weld the flanges back on. The problem is the Magnaflow uses high-flow cats (which means better performance) but the issue is that it takes away from flange lenght by an inch and the piping after the cats is also bent very hard and in a shorter amount of space. OEM and Magnaflow's height from below the y-pipe curve to the top of the rear flange is 19", but the way this is accomplished is different due to the bends, angles, and the lenght of the cat bricks.
Fuel rail heat wrap:
I used Design Engineering’s kit which came with injector wraps (didn’t use), a fuel rail cover, and the small piece of fiberglass that covers the holes between the intake manifold tubes. This kit works on a wide year range of 4.0’s so if you are an older model you can use this, as the cylinder head bolts that this has holes for will line up. The only small issue for my fuel rail wrapping was that my fuel rail has a vent cap that the wrapping didn’t have a pre-cut hole for, so I used a knife and made an ‘x’ and it slipped on. I used scissors to cut the extra strings, as the material’s coating is string-like.
Intake Manifold Painting:
I used Rustoleum’s high heat primer and high heat engine enamel paint. Two coats of primer and two coats of paint. I wanted to do a third coat of paint to make it even smoother but I really wanted to get it back together and I did dump on the paint the first two coats. If I did a third, it would be even smoother looking, but I think it would have been overkill. The paint serves a second purpose besides aesthetics. It will act as a heat shield for the intake manifold, so the air should be cooler. I used up two cans of brake cleaner, metal scrub brushes to work the cleaner in as it soaked for over 10 minutes, and finally, pressure washed it. I did this over six times and used both cans. Don’t torch them like some people say – yes, metal is tough but that type of heat for that long will cause aluminum to expand and that precision is needed!
Manifold(s) Installation:
Do not make the same mistake I did when installing the intake manifold: I didn't seat it correctly. This created vacuum and because it was much more of a leak than a disconnected vacuum tube - my engine red-lined hard. I had to rip it all apart and do it over again and get the FelPro gasket because I made an impression on the first gasket. I'd highly recommend using a FelPro gasket for both exhaust manifold and throttle body and ditch the high heat silicone Doug Thorley wants you to use. In a picture below, you can see why my intake manifold didn't seat right and I didn't catch it. There are two lower gasket studs that are about 0.25" long that guide the gasket - there are also two holes in the intake manifold for those holes, but I didn't think anything of it. Get a smartphone or small camera with a flash, reach under the manifold before you torque the bolts to 40-foot pounds and CHECK! You will need a second set of hands to hold the manifolds in place as another puts in the bolts and finger tightens them to hold everything in place. Make sure everything is lined up. The headers are cut in half for easier installation but make sure the gap between them is even. You'll know what I mean when you do it. The headers do rest on two outer studs but the upper center bolt is that holds them good.
---CONCLUSION READ THIS:
Between the header’s design and ceramic coating, the heat resistant paint on the intake manifold plus the fuel rail wrap – I’d say my engine temps are lower, throttle response and coasting down a road is greatly improved, and maybe some mpg's (not sure yet). Consider that the header’s and Magnaflow piping flow better and allow the engine to work more efficiently which means less fuel used, which means less heat. But above all else – the sound is fantastic on the outside. There is a lot more rumble coming from under the engine and the whole vehicle itself instead of just out the back with just OEM or even only the Flowmaster 40 I had installed previously. It really makes a difference. Again, this a project you do not want to rush on. It will take time and modification. There is some 1500k rpm exhaust drone inside from the muffler but I think it is just right. Everyone has different tastes of interior exhaust sound, but I wouldn't do exhaust for interior sound - it's for exterior sound. And mine is super deep and rumbly, so my mission is accomplished. I painted my manifold to show that "I was in the engine bay and did something major." You will never have the intake manifold out again - so just do it! Also, for older 4.0's that don't have the curved style intake manifold that is found on the last generation of 4.0's ever made - I'd suggest putting that one in to get 20hp. If your intake manifold doesn't look like mine - go find one!


")


