Jeep Enthusiast Forums banner

Axle shim installation

1 reading
43K views 27 replies 5 participants last post by  optdoug  
#1 ·
Hey guys,
I am installing some new axle shims to help with the vibration that I get after installing my shackle relocation kit.
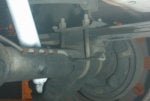
As you can see from the pics, the pinion angle is way off. I am getting some new 6 degree shims to fix the problem. My question is what is the easiest way to install the shims. If anyone has a link to a good write up, or if you can tell me how to do it, that would be greatly appreciated.
 

Attachments

#2 ·
Jack up the rear axle as high as possible, place jackstands under the frame rails, remove tires and wheels, remove nuts from u-bolts, lower axle down to seperate axle from leafs( watch the brakeline), place a c-clamp on each side of centerpin on leafs with enough room for the shim in between, unbolt center pin and remove, place shim under leaf and install new center pin, remove c-clamps, repeat on other side, raise axle to shims, bolt up the u-bolts, reinstall tires, raise jeep enough to remove jackstands, lower jeep to the ground. You may need to disconnect the lower shock mounts to lower the axle enough to get them in there depending on how much droop your shocks have. I know pictures would be more helpful, but I have none of this process. Be sure to put the fat part in the front to lower the pinion.
 
#4 ·
Thanks for the help guys. And thanks a ton Fever for the tutorial. I did manage to pick up a set of 6 degree shims, but I dont think I'll need them. I Think that the shims that are in there now are 4 degree shims, or maybe a little less. I have not measured What the angels are, but the transfer case is about level, maybe slanting down just a degree or two. And you can see that the pinion is pointing way up. I don't know what the exact angle is, but it has to be at least 10 degrees up from level. Unfortunately, I ran out of time for this weekend, so I'll have to finish it next weekend.
Also, if you look at the pics, you can see that the wider part or the shim is facing the rear. The guy i got the new shims from told me the wider part of the shim should be pointing towards the front of the Jeep. Is that true?
 

Attachments

#5 ·
Depends on which way you are trying to move the pinion. ;)
For our springs OVER axle, wider at the back points the pinion UP, wider at the front points it down (and you shouldn't ever need to point it down!).
It's hard to tell from the picture, but that shim looks like it's more than 4 degrees. Is it thicker or thinner than the 6 degree you bought?
If it's thicker, you are moving in the right direction. You might even need a smaller shim. Buy a cheap magnetic degree finder and measure :D
 
#6 ·
I had to shim my pinion down after adding longer shackles. With the stock driveshaft you want the pinion parallel to the output, not pointed up at it like with a slip yoke eliminator. The shackle relocation brackets lower the rear of the leafs pushing the pinion upwards. I would try just removing the current shims and see how it does. Or do like sAe23 said and buy a cheap magnetic angle finder and check the angles. Mine aren't perfect, but shimming the pinion down 4* got rid of my vibrations.
 
#7 ·
XJ is right. I think I do have to point it down. Currently the pinion is pointing up like in the first pic. The only problem is I have a the stock driveshaft with a slip yoke. It really needs to be like the second pic, so the pinion is parallel to the the output. I just hope I dont have problems with the driveshaft being too short. I have a feeling that a SYE is the real fix, but I think that will cost me over 500 bucks with the cost of the SYE and new driveshaft.
I am not 100% sure that the old shim is 4 degress, but it is a little thinner than the 6 degree shims that I got yesterday. So no I have 3 options. No shim, a 4 degree shim and a 6 degree shim. I'll just have to see which one works the best for the angle.

Thanks!
 

Attachments

#8 ·
Have you already done a transfer case drop?

How much lift do you have? (its not in your profile)

We paid $140 for our SYE and $235 for our DS
 
#11 ·
No, I dont have a transfer case drop and since I installed my shackle relocation kit a few months ago, I am up to about a 4.5" lift. http://www.hdoffroadengineering.com/collections/frontpage/products/xj-shackle-relocation-kit I have a feeling that the SYE is going to be the ultimate fix, but shimming is going to have to work for now. I just hope that the driveshaft is not too short after changing the angle of the rear end.
It's ony Tuesday now and I have to wait for the weekend to work in the Jeep. Oh well.
 
#9 ·
You can buy the HD SYE for about 165.00 and use a stock front driveshaft which can be pretty cheap if you look hard enough. But I would try shimming the pinion down first and see if that works. I have about 4" of lift and I got rid of mine, but I think any more lift would require the SYE. I haven't had any issues with the driveshaft falling out or anything but it is pulled back about as far as I am comfortable with.
 
#10 ·
I bought a brand new (in the box) advanced adapters SYE (lucky) off CL reecently. I had the 1 in t-case drop with my 4.5 in lift and stock ds when the sy was in. We ordered the ds yesterday. I have heard that you can use the stock front ds from an XJ as well though.
 
#12 ·
take the shims out. The shackle relocation does the same thing basically, so you're shimmed way too much currently. You certainly don't need 6* shims, maybe more like 2*, or none at all with your setup.
 
#13 ·
Thanks Justin, I have been thinking the same thing. I think I will start with no shims at all. After looking at it over and over, it just seems like the relocation kit changed the angle the opposite way of the original lift kit. I think I have have no shims at all, that might be the best solution.
When and if I get an SYE, I'll have the shim to put back in.
 
#14 ·
Ok Justin,
Now I am really jealous. I just saw your writeup on the HD Offroad Engineering relocation bracket and I see that you have the new version of them. Unfortunately I have the old version where you have to mangle your shackle boxes, but I like how you state that you have to massage the boxes with the old version :)
I wish I would have waited a few months or just got the one from RC.
 
#15 ·
you also need to do the dreaded tcase drop. that will help temporarily until you do the sye and ds
 
#16 ·
I think you are right and I am odering one today. I'm kind of freaking out thinking that my DS is going to be way too short after I change the angle of the pinion. Hopefully the drop kit will help me get a little bit of the DS length back.
 
#17 ·
I just took out my drop if you want i can send you the blocks for like $5
 
#18 ·
I had this:

4.5in lift, 1" tcase drop and everything was stock. Minimum vibrations. Just upgraded to 4.5 full pack springs (had aal that were sagging), removed the tcase drop, installed sye and extended brake line (from a 95 yj) for the rear this weekend, and ds is on its way.
 
#20 ·
I think they are rough country. Just standard 1in drop
 
#22 ·
OK, so I just finished pulling the old shims out. It turns out they were 4 degree shims. Now that they are out, the pinion is more inline with the transfer case. It ended up taking me about 4 hours to do both because I fan into a couple problem. The first problem was releasing the center pin without first clamping the leafs. that was a pita to get it all lined up and the pin installed. The other problem is that I found the bolt that goes through the front spring mount is sheared off :( :( I have no idea how that happened, but I know it has been that way for a while. Sometimes when I have the brake applied and I turn the wheel I hear a pop. I have been wondering where it is coming from, and now I know. I must have looked at it for over and hour thinking how the heck I am going to get the broken bolt out of there. The only thing I can think of is to drill a large hole in the frame rail so I can get to the bolt. It's almost impossible to get a straight shot at the hole from the side because the rocker is in the way, and I don't really want to cut that up. If anyone has ant ideas, I'm all ears.
 
#23 ·
which side is it sheared off at? outside (rocker side) or inside (frame rail side)? You can do what a lot of people end up doing when they swap leaf packs and can't get that bolt out.

A lot of people push the leaf pack as far as possible toward the outside of the mount box, then use a angle grinder/sawzall to cut the bolt as close the the spring eye as possible (the point being to leave as much bolt length sticking out as possible from the frame side). Then you should be able to grab onto it with some big vice grips and turn it out. Also a good idea would be to shave two flat spots in the bolt shaft to keep the vice grips from just turning on the shaft.
 
#24 ·
The bolt is broken off at the frame rail side, and it is broken inside of the frame rail. There is nothing sticking out to grab onto. I have a feeling I will have to drill some kind of hole on the inside of the frame rail to access the nut. From what I have read, the nut is tack welded inside of the frame rail. I suppose I could break the nut off and then just replace it with another one. The only thing I don't know is if making a hole in the frame rail will weaken the frame.
 
#25 ·
ugh yea that sucks. You can cut a slot in the spring box directly below the nut to access it. Breaking it off might be the best solution for your situation. Making the slot in the spring box will not impact the frame.

A better/easier solution might be to cut a hole in the floor directly above the spring box (it's open on the top) to access the bolt/nut.

See here: http://www.cherokeeforum.com/f2/snapped-leaf-spring-bolt-pics-how-would-you-remove-18938/
 
#26 ·
Hey Dukie, thanks a ton for that link. I think I will go through the floor to get at it. That looks like the best solution. Then At least I'll be able to get at the nut when I have to get at it again.
I think if I go through the bottom, I'll just be looking at a bad rust problem after a while.
This little problem will have to wait till next weekend though. I have a feeling if I work on my Jeep again this weekend, one of my neighbors will complain again. For some reason I have at least one neighbor that I know of that constantly complains to the homeowners association every time I work on one my cars. I have a feeling that he and maybe others think I'm trailer trash just because I work on my own cars. I even had to pay a $500.00 fine once for working on my Jeep. Someone even took pictures of me under my jeep for proof that I was a piece of trash working on his Jeep :laugh:. I guess in my townhouse complex, men are not allowed to do things that men do. I guess the men in this complex are only allowed to go to the store and buy ******s and tampons for their wives, but working on your car is out of the question. :laugh: Believe it or not, this is the picture that cost me $500.00.
 

Attachments

#27 ·
**** that ****. HOAs are such BS. Does your agreement specifically say you can't work on vehicles?

Honestly, I'd try just talking to the person that complains. Stress the fact that you're not trailer trash, and simply like doing your own repairs, and that you respect noise levels and will always keep the work area clean during and after. See what their concerns are - maybe you can address them to avoid future conflict. Maybe they'll chill out.

Hell...invite them over for dinner/beer and make good. Would be worth it in the long run.
 
#28 ·
:laugh: I have never seen a copy of the CC&R's, but I have been told that working on your own car is not allowed. I am only a renter here. It's a long story, but I am stuck here until next summer to keep my son in the high school that he has gone to for the last three years. After that I am moving to a house that I own. It's kind of funny that us parents make these kind of sacrifices for our children, but I think it's worth it.
It's kind of weird, but a lot of my neighbors used to talk to me and say hello, now they almost turn and run when they see me coming like I am Elephant Man or something. I suppose they talk to each other at the HOA meetings. :laugh:
For now when I work on any of my cars, I just close the garage door and do my thing. The only problem is that it gets really hot in the garage with the door closed. When I was working on the Jeep yesterday and Saturday, I soaked my tshirt and coveralls in sweat.