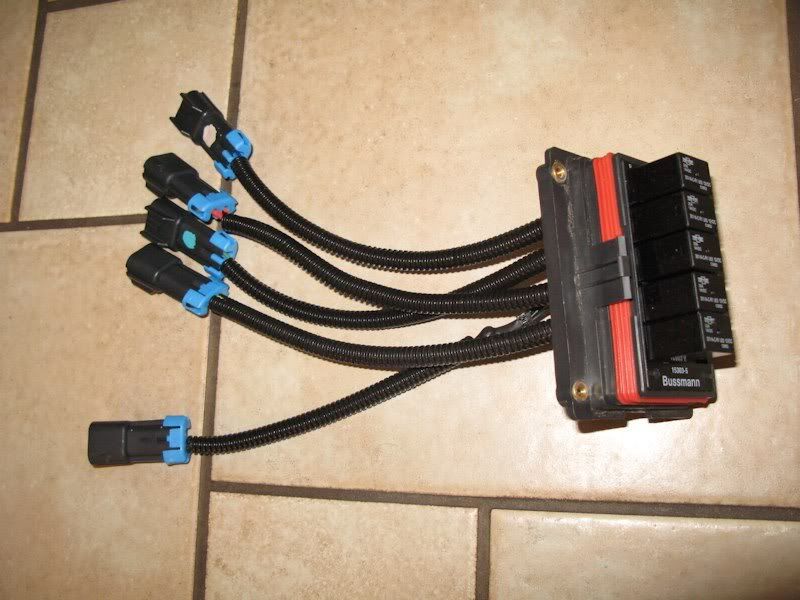
I am going to build a Bussman relay/fuse panel to power my headlight upgrade and my auxiliary Lights. I was looking at building my own harness and at all the options out there and came across this box. Its a neat, compact and very elegant solution. Unfortunately this guy is not selling these assembled any more.
![Image]()
![Image]()
http://forum.ih8mud.com/merchandise-storefront/352802-auxiliary-fuse-relay-panel.html
With 5 relay circuits I can power my High and low beams for my H4 upgrade, my fog, driving and reverse lights. Here is another version using the same components but he has added weather pack connectors between the box and individual harnesses to each light. I like that option too.
![Image]()
http://www.jk-forum.com/jk-electrical-lighting-sound-systems-13/auxiliary-electrical-hookup-119415/
Purchasing the parts from waytek with their minimum order quantities it is about $131(before shipping) for the parts to build one box and 6 sets of 3 conductor weatherpack connectors with quite a bit of extra stuff left over. I like the 3 conductor connectors to be able to run a good ground to each light. . If you increase the order for enough to build 4 boxes, there is almost no leftover parts and the cost per box drops dramatically to $72(before shipping). This includes everything except wire and loom wrap, and high temp H4 sockets if you are going to use some of the box for a headlight upgrade. It does include 12 of those loom clamps for 1/2" Loom
I have searched this forum and others and have not found anyone putting these together any more, nor have I found a solution near as elegant. So, is there anything out there I am missing. If not, are there 3 guys out there would would like to buy a set of parts at cost so we can take advantage of the economy of scale? I'm likely gonna do it either way, unless there is a better solution, but I would just as soon save $60
http://www.nxtbook.com/nxtbooks/waytek/catalog225/#/133/OnePage
http://www.nxtbook.com/nxtbooks/waytek/catalog225/#/31/OnePage
http://www.nxtbook.com/nxtbooks/waytek/catalog225/#/133/OnePage
http://www.nxtbook.com/nxtbooks/waytek/catalog225/#/102/OnePage
Name..........................................................................................Part#........Qty....Price/Each...Total
WEATHERPACK CONNECTOR SHROUD HALF 3 CONTACT BODY 12010717..38044........20.....$0.3019.......6.038
WEATHERPACK CONNECTOR TOWER HALF 3 CONTACT BODY 12015793...38045........20.....$0.5742.......11.484
WEATHERPACK TERMINAL 12 GA MALE 12124587................................32038........50.....$0.1451.......7.255
WEATHERPACK TERMINAL 12 GA FEMALE 12124581.............................32039........50.....$0.1622.......8.11
WEATHERPACK TERMINAL 16-14 GA MALE 12124582............................31034........50.....$0.1275.......6.375
WEATHERPACK TERMINAL 16-14 GA FEMALE 12124580.........................31035........50.....$0.1287.......6.435
MINI FUSE AND MICRO RELAY RTMR PANEL BUSSMANN 15303-5-2-4........46345........1.......$26.0100.....26.01
DELPHI CABLE SEAL- GRAY #12010293 CHANGED TO 15324980 16-18ga...39001.......100.....$0.0634........6.34
DELPHI CABLE SEAL-BLUE #12015193 CHANGED TO 15324981 12ga.........39002........100.....$0.0708.......7.08
PACKARD CAVITY PLUG-GREEN DELPHI # 12010300...............................39010.......100.....$0.0669.......6.69
MOUNTING BRACKET ATO / ATC & RTMR FUSE BLOCKS..........................46085..........2......$4.1300.......8.26
METRI-PACK 280 SERIES FEMALE 12110845 TERMINAL 14-12GA..............31069.........50......$0.1091......5.455
METRI-PACK 280 SERIES FEMALE 12129409 TERMINAL 16-14GA..............31068.........50......$0.1127......5.635
SONG CHUAN MICRO RELAY 35A 12V SPST RESISTOR............................75730...........5......$2.9100.....14.55
ROSEBUD CLIP .413 OR .500 ID FOR CORRUGATED LOOM........................21109.........50........$0.1279......6.395
Moderators: I hope this is OK to post. I'm not pushing any product or trying to sell anything at a profit. Just thought I might be able to save a little and help someone else save some too.
http://forum.ih8mud.com/merchandise-storefront/352802-auxiliary-fuse-relay-panel.html
With 5 relay circuits I can power my High and low beams for my H4 upgrade, my fog, driving and reverse lights. Here is another version using the same components but he has added weather pack connectors between the box and individual harnesses to each light. I like that option too.
http://www.jk-forum.com/jk-electrical-lighting-sound-systems-13/auxiliary-electrical-hookup-119415/
Purchasing the parts from waytek with their minimum order quantities it is about $131(before shipping) for the parts to build one box and 6 sets of 3 conductor weatherpack connectors with quite a bit of extra stuff left over. I like the 3 conductor connectors to be able to run a good ground to each light. . If you increase the order for enough to build 4 boxes, there is almost no leftover parts and the cost per box drops dramatically to $72(before shipping). This includes everything except wire and loom wrap, and high temp H4 sockets if you are going to use some of the box for a headlight upgrade. It does include 12 of those loom clamps for 1/2" Loom
I have searched this forum and others and have not found anyone putting these together any more, nor have I found a solution near as elegant. So, is there anything out there I am missing. If not, are there 3 guys out there would would like to buy a set of parts at cost so we can take advantage of the economy of scale? I'm likely gonna do it either way, unless there is a better solution, but I would just as soon save $60
http://www.nxtbook.com/nxtbooks/waytek/catalog225/#/133/OnePage
http://www.nxtbook.com/nxtbooks/waytek/catalog225/#/31/OnePage
http://www.nxtbook.com/nxtbooks/waytek/catalog225/#/133/OnePage
http://www.nxtbook.com/nxtbooks/waytek/catalog225/#/102/OnePage
Name..........................................................................................Part#........Qty....Price/Each...Total
WEATHERPACK CONNECTOR SHROUD HALF 3 CONTACT BODY 12010717..38044........20.....$0.3019.......6.038
WEATHERPACK CONNECTOR TOWER HALF 3 CONTACT BODY 12015793...38045........20.....$0.5742.......11.484
WEATHERPACK TERMINAL 12 GA MALE 12124587................................32038........50.....$0.1451.......7.255
WEATHERPACK TERMINAL 12 GA FEMALE 12124581.............................32039........50.....$0.1622.......8.11
WEATHERPACK TERMINAL 16-14 GA MALE 12124582............................31034........50.....$0.1275.......6.375
WEATHERPACK TERMINAL 16-14 GA FEMALE 12124580.........................31035........50.....$0.1287.......6.435
MINI FUSE AND MICRO RELAY RTMR PANEL BUSSMANN 15303-5-2-4........46345........1.......$26.0100.....26.01
DELPHI CABLE SEAL- GRAY #12010293 CHANGED TO 15324980 16-18ga...39001.......100.....$0.0634........6.34
DELPHI CABLE SEAL-BLUE #12015193 CHANGED TO 15324981 12ga.........39002........100.....$0.0708.......7.08
PACKARD CAVITY PLUG-GREEN DELPHI # 12010300...............................39010.......100.....$0.0669.......6.69
MOUNTING BRACKET ATO / ATC & RTMR FUSE BLOCKS..........................46085..........2......$4.1300.......8.26
METRI-PACK 280 SERIES FEMALE 12110845 TERMINAL 14-12GA..............31069.........50......$0.1091......5.455
METRI-PACK 280 SERIES FEMALE 12129409 TERMINAL 16-14GA..............31068.........50......$0.1127......5.635
SONG CHUAN MICRO RELAY 35A 12V SPST RESISTOR............................75730...........5......$2.9100.....14.55
ROSEBUD CLIP .413 OR .500 ID FOR CORRUGATED LOOM........................21109.........50........$0.1279......6.395
Moderators: I hope this is OK to post. I'm not pushing any product or trying to sell anything at a profit. Just thought I might be able to save a little and help someone else save some too.