I'm updating this thread, lot of steps. So my CJ5 feels like a Saturn 5 on takeoff on a hill especially. If I Rev higher RPMs it smooths it some. Feels like the Jeep will come apart, ugh.
so step one was to fix the rear drive shaft get a double Cardan. Did that, and 50% correction maybe. Needed it, had another thread on that, but it was well worth it and needed.
So reading what it can be, from front to back:
1. Bad Motor Mounts (Mine are bad)
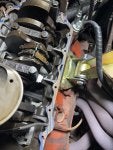
2. Leaking Oil fouling flywheel/clutch (mine leaks, looks like pan and RMS at minimum)
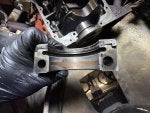
3. Flywheel scorched/warped (My fly wheel scorched now that I see it, big time)
4. Wallowed pilot bushing (Mine is now that I see it)
5. Loose Bell Housing Bolts (Mine weren't....BUT...my bell housing had a crack, big one, super nice.
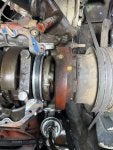
6. Bad trans Mount and Torque bar (Mine was wasted and the torque bracket bent and bolt and bushings melted to crap)
7. Incorrect Drive Shaft, doesn't have Double Cardan DS but the perches on the axle are welded to have them point at the TC output. So this needs a new DC DS.
So started looking to make a plan (I’m weird, will lay on crawler and just look and think options).
This trans Mount, whatever this 1 bolt item is, don’t know the official name, on Jeepsterman it looks like Stud and Insulator.
That’s looks like toast, not sure what a good one looks like, and I can hand spin the washers under the nut under the skid, so pretty sure that does little to nothing.
Also, there is oil all over at the RMS location. It blows all over, so it can be other leaks, but looks to me that the block is clean and not real wet above near the valve covers, so not an issue.
I feel like a RMS, Clutch job with resurfacing flywheel and new trans mounts are the next phase. Look about right to y’all?
![Image]()
![Image]()
![Image]()
![Image]()
so step one was to fix the rear drive shaft get a double Cardan. Did that, and 50% correction maybe. Needed it, had another thread on that, but it was well worth it and needed.
So reading what it can be, from front to back:
1. Bad Motor Mounts (Mine are bad)
2. Leaking Oil fouling flywheel/clutch (mine leaks, looks like pan and RMS at minimum)
3. Flywheel scorched/warped (My fly wheel scorched now that I see it, big time)
4. Wallowed pilot bushing (Mine is now that I see it)
5. Loose Bell Housing Bolts (Mine weren't....BUT...my bell housing had a crack, big one, super nice.
6. Bad trans Mount and Torque bar (Mine was wasted and the torque bracket bent and bolt and bushings melted to crap)
7. Incorrect Drive Shaft, doesn't have Double Cardan DS but the perches on the axle are welded to have them point at the TC output. So this needs a new DC DS.
So started looking to make a plan (I’m weird, will lay on crawler and just look and think options).
This trans Mount, whatever this 1 bolt item is, don’t know the official name, on Jeepsterman it looks like Stud and Insulator.
That’s looks like toast, not sure what a good one looks like, and I can hand spin the washers under the nut under the skid, so pretty sure that does little to nothing.
Also, there is oil all over at the RMS location. It blows all over, so it can be other leaks, but looks to me that the block is clean and not real wet above near the valve covers, so not an issue.
I feel like a RMS, Clutch job with resurfacing flywheel and new trans mounts are the next phase. Look about right to y’all?