Jeep Enthusiast Forums banner
1 - 20 of 24 Posts

southtx

· Registered
Joined
·
67 Posts
Discussion starter · #1 ·
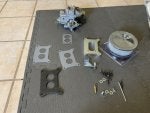
Does anybody have the install instructions for the “Gronk” carburetors from Ebay? I purchased the MC 2150 and he was supposed to email the instructions but he’s not responding to emails, texts or phone calls. I’ve never installed a carb before and there are several parts to this kit. I read the other posts with others having the same issues with post-sale communications...
 
Discussion starter · #8 ·
Sorry about the bad link. I didn't try it before posting it.

I'm sure someone, here, has a copy of what you are looking for. If not, I'm sure we could walk you thru it.

Matt
HI here is a couple of pictures that might help One is a diagram parts list the the other is complete post of a rebuild.
good luck
tim

http://www.therangerstation.com/tech_library/pdf_documents/motorcraft_2150_carb.pdf
Thanks for the replies Matt and pedal2, this painless harness it taking me longer than I expected to install. May be late tonight or tomorrow before I can get to the carb install.. Biggest thing first for me is knowing which order the below spacers go down and do I need to use any sealant while installing the carb? Again, probably stupid questions but I've never done this and according to the sales pitch from gronk its setup custom with a down pull accelerator bracket. I THINK I can figure out the linkage and emissions stuff by previous posts on this forum. I'll start hitting it up hard tomorrow. I plan on keeping the charcoal canister and likely the EGR to deal with any fumes but I would like to rip everything else out. I also installed an HEI from Summit so I'll need to work that in to the setup.. Thanks again!
 

Attachments

Discussion starter · #9 ·
Ok, so I tried mounting the carb tonight. The only way I could figure out to mount the gaskets in the photos were in the following order starting on the intake:

1. Small carter type gasket
2. Metal Spacer / Carb Mount
3. Large grey gasket
4. Black phenolic gasket (heat shield/spacer?)
5. Large grey gasket
6. Carburetor

Does that sound right? It looks like thats the only way to install it. The 4 bolts that mount the carb thru the gaskets and into the metal spacer were too short so I will have to find some longer ones tomorrow...

Thanks!
 
Looks like the way it goes to me, but I haven't messed with that type of carb in years.

The small gasket seems to match up with the intake manifold and the adapter spacer (aluminum one) seems to be machined to mate with the small gasket and then allow mounting of the heat sink spacer and carb on top of it in that order.

Hopefully someone will chime in that's more familiar with the setup.
 
Discussion starter · #12 ·
Looks like the way it goes to me, but I haven't messed with that type of carb in years.

The small gasket seems to match up with the intake manifold and the adapter spacer (aluminum one) seems to be machined to mate with the small gasket and then allow mounting of the heat sink spacer and carb on top of it in that order.

Hopefully someone will chime in that's more familiar with the setup.
Thank you for your response. Looks like thats the only way they will go on.

hello

you have the stack up correct. if it was me i would install studs into the aluminum plate. that is the way that almost all carbs were mounted onto a intake. i also think in my opinion it will save the threads in the aluminum .

oldschool
Thanks for confirming the stack order. The studs are a good idea and completely slipped my mind this morning when I was searching the garage for longer bolts. I'll install those today.
 
Discussion starter · #13 ·
I mounted the carburetor with studs as per oldschool (thank you) and everything seemed to go on good. I had a brass pin that presses into the carb body under the electric choke that kept falling out (it was loose on the bottom of the box when i got it as well). It has a c-clip on the outer end and holds up a linkage under the choke. It would shimmy back out as i was manipulating the linkages. I pressed it in pretty far and it feels snug but it would slowly slip out after moving the linkages up and down several times. I ended up placing a small dab of permatex thread sealant inside the hole and then pressed the pin back in. Hopefully it will be enough to keep it from working out later. Here are some pics of the carb installed for anyone else that may need the info...
 

Attachments

Discussion starter · #14 ·
Here’s where I would really appreciate the kit instructions from Gronk. This is the downward pull linkage that he installed on the carb that I will now have to figure out. Do I need to re-install my old linkages underneath this or hook up the accelerator directly? I’m guessing I add the old linkage and somehow get them connected together. I have some linkage parts at the powdercoater among a few other things but I have an old spare here to mess around with for now. Time to browse photos...
 

Attachments

HI looks to me you should be able to just take off the stuff he added and connect your throttle right to the knob on the carb (at top where he has that bolt) that's the original spot. after you get your parts from the powder coat'er.
good luck
tim
 
Discussion starter · #16 ·
HI looks to me you should be able to just take off the stuff he added and connect your throttle right to the knob on the carb (at top where he has that bolt) that's the original spot. after you get your parts from the powder coat'er.
good luck
tim
I may try that for now. I ordered the down pull throttle because Gronk said the straight pull wouldn't work with a brake booster. I don't have a brake booster yet but I plan to upgrade to one in the next couple of years. I'll take pics of how he has the bracket currently installed so that I can reattach it later if necessary. Thanks for the advice!
 
I ended up placing a small dab of permatex thread sealant inside the hole and then pressed the pin back in. Hopefully it will be enough to keep it from working out later...
Thread sealant or thread locker? Thread sealant is the white paste stuff used to keep coolant or oil from getting past the threads like when a head bolt goes into the water jacket. Blue or red locker is used to keep a bolt from backing out.
 
Discussion starter · #18 ·
I ended up placing a small dab of permatex thread sealant inside the hole and then pressed the pin back in. Hopefully it will be enough to keep it from working out later...
Thread sealant or thread locker? Thread sealant is the white paste stuff used to keep coolant or oil from getting past the threads like when a head bolt goes into the water jacket. Blue or red locker is used to keep a bolt from backing out.
My bad, Orange, I used the threadlocker, red high temp was the only tube I had that was small enough to get down into the hole without getting it on the linkages, etc.
 
Discussion starter · #19 ·
Got the linkage back from powdercoater and installed. Now to figure out how to hook it up and whether or not I should keep the down-pull linkage on there or just pull it off as pedal suggested... I am planning on the MC booster upgrade in the future and my understanding is that the regular linkage won’t work. Hmm.. I’m basically jumping between this and the harness / speedhut gauge install. And I also found out today that my new IDIDIT steering column is backordered until late July or early August. Dangit.
 

Attachments

Attachments

1 - 20 of 24 Posts