Jeep Enthusiast Forums banner

NPT vs. MPT

1 reading
16K views 17 replies 8 participants last post by  JeepHammer  
#1 ·
need 3/8" NPT plugs for air tank but can find them at any home store in the tools or hardware areas.

at home depot, they have MPT plugs in the plumbing section.

googling the differences, i find that its safe to use either way b/c the national standards are the same. or i find that the NPT has tapered threads with 18 pitch count and that that's different from MPT.

are you still with me?? this is confusing. so, who know's if MPT can be used in my NPT treaded tank?

edit: if these will work, do i use Iron, Maliable Iron, Galvanized Iron, or Maliable Galvanized Iron?

My systems max PSI is 150ish
 
#3 ·
I have indeed checked, to no avail.

after reading more on the 4 diff materials, the Maliable versions are rated at 300 max psi, while the others at 150 max psi.
All are said to be used ok with air applications.
 
#6 ·
Not sure where you found a different specification for MPT. In my neck of the woods, MPT means Male Pipe Threads, referring to an NPT fitting with Male Pipe Threads. FPT would be Female Pipe Threads.

"i find that its safe to use either way b/c the national standards are the same. or i find that the NPT has tapered threads with 18 pitch count and that that's different from MPT."

This statement doesn't make sense. Either they're the same or they are not.

I did Google it and found the same explanation I just gave at the top of the post.

Don't obsess on the material. For your pressure range any of the fittings you will find at the local hardware store should be fine.

Hope this helps.

trailhead:cheers2:
 
#8 ·
NPT MPT = same difference NPT is National Pipe Thread which is what all pipe thread is I have ever seen. MPT = Male Pipe Thread (read MNPT) and FPT = Female Pipe Thread. Same differnce, jes getcha a 3/8 pipe plug and go for it.

I reckon it don't make me a genius or nothin', but I work as a salesman at a hardware store all day so I got at least some bonifides.

:2c:
 
#10 ·
First off, I know what places tell you...
And I've seen it in print more times than I can count...

BUT!

NPT stands for NATIONAL PIPE TAPER (not 'Tread').
Plumbing threads are TAPERED so the parts self seal when you tighten.
(Interference Fit)

If you don't believe me, try and order a 'National Pipe Thread' tap sometime and I bet you get an education or outright laughed at...
-----------------------

If you use sealer, DO NOT crank down on the plugs or any other tapered fitting!
This is a VERY good way to split out a fitting (or twist off a soft metal fitting).

Anyone that has cranked a tapered plug into the water jacket of an aluminum manifold too tight has learned a valuable lesson!
That taper WILL split the aluminum boss out on a brand new intake!
(Ask me how I found that out... :mad: )

I've even seen aluminum transmission housings cracked where the fill plug was cranked down hard on, so it WILL HAPPEN.

When you are threading a brass plug/male fitting into a steel boss,
like on an air tank,
It's not real critical, but it's always a good idea to tighten up, then pressure up, see if there is a leak, and if so, give it a little more.... Just until the leak stops.

If you are doing an air system where moisture is going to be present, DO NOT use steel plugs in steel fittings without NEVER SEIZE or Teflon pipe dope!
Forget the threaded tape with steel to steel fittings.

Teflon tape works fine with brass or aluminum to steel, but not steel to steel,
(Again, ask me how I found that out...)

The local FULL SERVICE auto-parts store or farm store will have all sorts of brass plugs in the plumbing section.

Mike, if you can't find them down there, let me know, I have BINS of them at work...
Push Lock line fitting also, so let me know.
 
#11 ·
well i did use steel plugs in the steel tank and i did use teflon tape after second guessing myself about it.
oh, and i did slightly crank on them.

boy, i just screwed myself all the way around didnt I?!!!

i should've known better than to not use antisieze. i'll get that redone the proper way. the last thing i need is for that steel-to-steel to rust from water vapor in the tank!

im about half way through redoing my OBA system so i'll start a new thread when i get done.
i need to go buy a "T" to go aft my regulator so i can run to both my axles and to a regulated chuck. might get another regulator for the rear. on second thought, maybe i'll just get a longer air hose. simplicity is key!
 
#14 ·
well i did use steel plugs in the steel tank and i did use teflon tape after second guessing myself about it.
oh, and i did slightly crank on them.

boy, i just screwed myself all the way around didnt I?!!!

i should've known better than to not use antisieze. i'll get that redone the proper way. the last thing i need is for that steel-to-steel to rust from water vapor in the tank!

im about half way through redoing my OBA system so i'll start a new thread when i get done.
i need to go buy a "T" to go aft my regulator so i can run to both my axles and to a regulated chuck. might get another regulator for the rear. on second thought, maybe i'll just get a longer air hose. simplicity is key!
You didn't really screw yourself, if you don't intend to remove the plugs anytime soon.

When you crank down on them really hard, then you gall the metal, and since it's an interference fit, they can seize in place really easily.
If you don't plan to use any of the ports in the future, don't sweat it, as long as they don't leak, you are fine.

If you intend to expand your system later, you might want to consider brass plugs for those holes.
Brass deforms easily to plug up any leaks, so you don't have to crank down on them,
But anti-seize or teflon pipe dope still helps!

I don't mind using steel or iron plugs when I'm not going to use the ports in the future.
Once they rust into place, they almost never leak...
(Take a look at any home plumbing with steel pipes from 60 or 70 years ago... That's HYDRAULIC pressure on them, and they just don't leak)

But they are usually IMPOSSIBLE to get out without damaging the threads to the point of uselessness.

How about some pictures of that sexy air system when you are done!
 
#12 ·
got the plugs redone with antisieze and holding air fine it seems.

a problem i ran into when testing is that im not reading anything above 10-15 psi at my manifold which is right near the compressor.
i can relieve the air pressure at the tank fine so i know its getting back there.
after about 20 seconds of running, the output hose on the compressor gets really hot. i removed the hose and put my finger over the output hole while its running and can only hold it there for for that 20 seconds before i have to pull away b/c of heat.
 
#16 ·
got the plugs redone with antisieze and holding air fine it seems.

a problem i ran into when testing is that im not reading anything above 10-15 psi at my manifold which is right near the compressor.
i can relieve the air pressure at the tank fine so i know its getting back there.
after about 20 seconds of running, the output hose on the compressor gets really hot. i removed the hose and put my finger over the output hole while its running and can only hold it there for for that 20 seconds before i have to pull away b/c of heat.
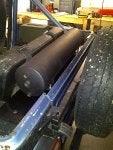
Do you have a 'Whip' on your compressor?
A braided stainless hose on the compressor about 15" or 18" long?
If you don't have, let me know and I'll send you one, I have a couple of extras laying around here, and you MUST have one.
The compressor head gets VERY hot, and will melt the seals out of regular fittings, melt lines shut, ect. when the compressor runs very long.

You may not see the melted lines inside of the fittings, but I will GUARANTEE YOU it will melt most lines!
Some guys run a whip to a hard line, then run a hard (usually aluminum) line to the tank or distribution block.
The idea of aluminum or copper line is to shed heat on the way to the distribution block or tank and cool the air down so you don't melt fittings.

Whips also keep hard lines from fracturing with the vibration of the compressor,
Compressors are vibration machines, and they are VERY HARD on hard line connections to them!

I used a 18" whip and never had any issues with melting lines when the whip was connected to an aluminum distribution block.

I usually put the distribution block at the end of the 'Whip',
The metal of the distribution/manifold block,
Especially brass or aluminum blocks, helps transfer heat out of the compressed air to atmosphere.
Even more so if your distribution block/manifold is mounted directly to metal, which works as a bigger heat sink for you.

A little dielectric grease helps keep moisture from collecting between block and sheet metal, keeping rust to a minimum...

Once the air hits the block, you should have outlets in all directions, forward, backwards, up for use with an air chuck...

Which gauge is giving you the strange readings, and do both gauges agree on tank/system pressure?

The distribution block gauge should be compressor/tank pressure,
The second gauge should show what the regulator is set at.
If you are going by the regulator gauge, then turn the regulator up and see if that changes things...
 
#13 ·
I'll need some information to help you troubleshoot this.

One of the things I think of first are a bad gauge, is it new or did you "repurpose" it from something else? Next thought is is there possibly a regulator in between your air source and the gauge?

Can you draw a simple schematic of your system? By simple, I mean just lines with boxes or circles for the various devices.

You will obviously have a compressor, air lines, at least one regulator, solenoid valve(s) for the axles, gauges, etc. That would help a lot. One thing you might want to do before you send it out is check the schematic against what you installed. I have been doing pneumatics for over 25 years and one of the biggest mistakes designers make (myself included) is do the installation and draw it afterward but what is drawn does not match what is installed.

It sounds like you are off to a good start and when this part of the project gets done you can be that much more proud because you did it yourself.

I'll be around most of the day today, but will be out of town tomorrow through Monday. You can PM me but I'm not sure I'll get the message. We're dirt biking in Mendocino this weekend!

trailhead:cheers2:
 
#15 ·
i'll do ya one better. heres a few unfinished pics.
top hose in manifold is input. bottom is out to tank.
elbow in regulator has been replace with plug until i figure out what im going to do with it.
the hose you see on the compressor is intake connected to a conical filter on the firewall.
 

Attachments