Jeep Enthusiast Forums banner

Best way to mount a Ford Contour Fan

16K views 30 replies 7 participants last post by  SteveOCJ5  
#1 ·
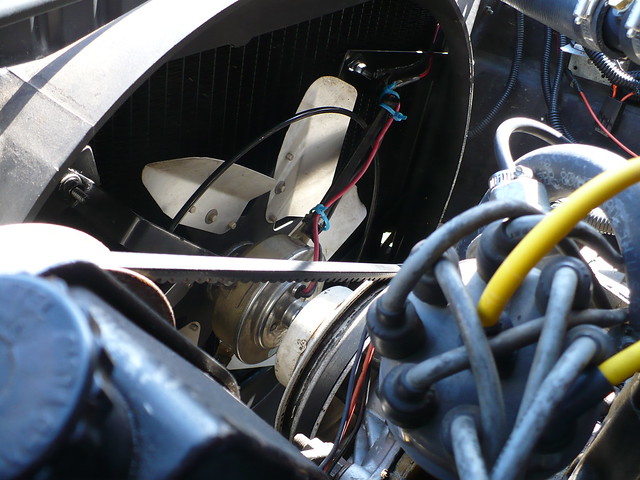
What tips and tricks have people come up with to mount the Ford Contour fan to a CJ7 radiator?

Some people have used the plastic ties that go through the radiator but I am not sure this is the best solution for a 4X4.

I have seen where some people mount brackets to the left and right sides of the shroud when mounting the fan on other types of vehicles but the CJ7 so close on the width that there is probably not enough room. I like this solution but am not sure how to make it work with the CJ7.

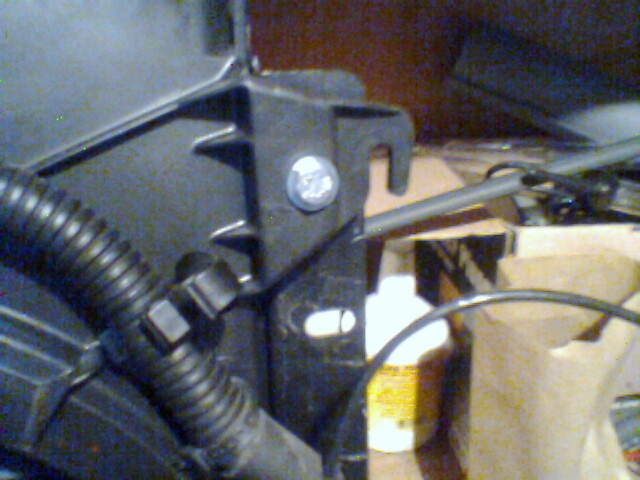
I would like to replace the bolts that hold the radiator I with all-thread that has a nut locktited in the correct positon so that a stud is sticking out of the back side of the nut and the stud can be used to mount the fan frame.

Please show me your well engineered mounting solutions.

Thanks...
 
#2 ·
I just used the ties.


But the lower part of the fan shroud rests on the lower tank (I had my 4-row radiator built with the core offset). I used 4 ties, and they seem stout enough. I've seen others that have fab'd some brackets and that seems to work too. Hopefully they will post up some pics for ya.
 
#3 ·
#4 ·
Thanks Hack.

I agree that the ties are the cleanest and for sure the easiest. I am just chicken. I also will be installing an A/C condenser soon to go with my Vintage Air Gen IV unit and want the ability to be able to remove and reinstall the fan easily with some bolt on method.

Please keep the Contour fan mounting ideas coming.
 
#5 ·
If you haven't already, have a look at the thread I posted most of these fans have mounting tabs that allow us to bolt them right to the radiator mounting bolt holes and flanges, the only mod was to remove that small top clip. Also, bolting it to the mounting holes in the radiator support relieves the possible stress on the lower tank.

Image
 
#9 ·
I've noticed fan mounting kits from NAPA using zip ties, but then a fan assembly weighs a lot less than a three row radiator filled with coolant.
 
#10 ·
That is how Hack in the second post mounted his fan. It looks great and probably is fine but there have been some reports of radiators getting leaks caused by the plastic tie wearing through one the cores. I do not know of any auto manufacturer that mounts a fan this way. Even the Contour fan is not mounted with ties from the factory. I have an idea for brackets. After I get it done, I will post pictures. My idea is to make a mount that will use the stock 4 bolts that hold the radiator in now so that is installation and removal is easy.
 
#11 ·
I've gotten a leak from a radiator temperature probe (fan controller) dielecrtic issue I suppose.
 
#12 ·
OK...I think I have the mounting of the contour fan figured out. I am replacing the radiator mounting bolts with stainless studs that I made out of stainless all-thread, a nut and red Loctite. I will be able to remove the fan and still have the radiator stay in place. This will make mounting and removal of the fan easier.

Now for the questions. The fan I got off of eBay. It is damaged and I will get a replacement when I find one but I need to know what some of the cut wiring is for. The fan you see ended up costing me nothing and I will have two spare motors when I find a shroud that is not damages.

1...there looks to be a diode or something in a black little capsule. Do I need this?

2... what did the cut wires go to in the original harness? It seems that there are 2 connectors or sensors that are cut off of smaller gauge wires. What were they for.

The fan runs on both high and low if I connect the correct wires. I just do not want to miss something and have too go back and fix it.


Thanks
 
#15 ·
I know these swaps work well with the V8's (shorter overall length) but I think I've seen a post where with the V6's the radiator support had to be moved closer to the grille to provide adequate clearance.
 
#16 ·
Just a few update photos.


I had to shorten my homemade stainless studs because they were too long. I had a problem with a nylon locking nut galling itself to the treads of one of my studs. I had to make another one. I may rethink using stainless in the future. I have used stainless many times in the past and never had a problem. In the past six months, I have had two projects go slightly south because of galling stainless steel fasteners.

The Dakota Digital PAC-2750 controller uses a VDO type 300F temp sender and can be adjusted for on and off temps for both low and high speeds. The PAC-2750 can actually use your stock or aftermarket sender of your temp gauge but I chose to install a second sender in the water neck for redundancy. I used the Volvo dual fan relay pack in place of the Dakota Digital relays because it was a simple and compact setup. I have some cleaning up to do but everything functions as expected. The controller will be moved from the dash but it is there to monitor and make adjustments while I am fine tuning the setup.

The fan does not fit tight up against the radiator. There is about a 1/2 inch gap on the top and bottom because of the thickness of the nut and washer on my stainless studs and the 1/8" thickness of my aluminum brackets. The sides are closed in by the radiator mounting bracket. I had some plans to fix this but the fan will pull a tee shirt tight against the outside Jeep grill on low speed so I have way better flow than I did with the stock Mustang 5.0 fan without a shroud. I am not sure I would want the fan to fit tight to the fins of the radiator where it could wear on the radiator.
 
#17 ·
The fan housing/shroud must fit flush against the radiator as air will find the path of least resistance, negating the usefullness of these fans. I've had mine in place for a couple of years now and there has been no discernable wear on the radiator or fan housing/shroud.
 
#18 ·
I have seen several installs where people use door edge molding to fil the gap and cushion the contact area. I have not looked for this molding yet but it is probably in my future if I can find something what works and that I like. I understand the ideal setup would be complete tight coverage but I went from a 5.0 Mustang clutch fan that had 25%-33% of the fan below the radiator to this Contour fan setup. On low the Contour fan will hold a tee shirt up against the grill even when it does not cover all of the grill. I really wanted the fan to be able to be unbolted without removing the radiator. I could easily replace the studs with bolts and get it to sit in tighter. The Contour fan sure is a great swap.
 
#20 ·
Some people use the same bolts to hold the fan that also hold the radiator. When you remove the bolts, the radiator comes loose. The studs that I used to hold the radiator in place stay in and only the outer nut needs to be removed to remove the fan assembly. If you need more clearance or need to replace a fan motor, you do not need to drain and remove the radiator. I also did not have to remove or drain the radiator for the initial install. I made the brackets that I mounted on the fan shroud, made the studs and installed them one at a time (replacing the stock radiator flange bolts) and then slipped the fan assembly into place on the newly installed studs. My radiator flanges did not have to be drilled or threaded and if I wanted, I could put the Jeep back to 100% stock if I wanted to. If I need to replace the radiator, I will not need to drill holes in the flanges to get everything to bolt up again either. If the way you did it works for you, that is good. I think this method will work better for me. I did a lot of reading and asking before I decided how I wanted to mount my fan and I am really happy so far with the results.
 
#22 ·
I'm a bit concerned with the OP's remark "I had some plans to fix this but the fan will pull a tee shirt tight against the outside Jeep grill on low speed so I have way better flow than I did with the stock Mustang 5.0 fan without a shroud".
Until I 'pulled my head out' the setup on 'BB' could also hold up a tshirt;
Image


Air will follow the path of least resistance and man this setup was horrible.

This is how tight the Mystique fan shoud fit on my three row radiator;

Image


Image


Image


Image
 
#23 ·
Your original setup had way too small of fan for that shroud. The fan has to fit the shroud. I did not have an overheating problem with the 5.0 setup and this one pulls more air. When I start in the morning, I do not hear all the fan noise that I had with the mechanical fan.

Do you not think it takes more effort for the fan to bend the air around the edge of the shroud than it does to pull it straight through the radiator? The sides in my setup are also enclosed because of the brackets on the radiator and it is a tight fit. I have a slightly different radiator than you do because I have about 1/2" at the top and about 1" at the bottom that the shroud does not cover. As I said before, I plan on some type of door edge molding or something to fill the gap.

And for your information...I tried the tee shirt and did not just talk about it.

I am glad you like your setup. I am glad you had the radiator out so you could fit it properly. I drove my Jeep until the day I decided to install the parts and then installed the fan and was back driving in just a few hours. I did not have the motor out so it would not be easy to drill the holes if I had not done it my way.

As I said I am happy you like your setup.
 
#24 ·
Sorry Stone Tower, it was not my intention to initiate a war of words. I meant only to be helpful. I retract any of my statements that were not taken in this spirit.
 
#25 ·
No problem. My only intension was to share an alternate way of mounting the fan which might be easier for some. I like projects that are accomplished in smaller bites even if sometimes it takes longer to get the job done. I have so many projects in other areas that if I tear my Jeep too far apart it might take me weeks to get it back to drivable condition as I will not have to time to finish it. If I can get everything ready without disabling the Jeep, I can find a couple of hours to "install" the project. I do have other cars I can drive, but I feel "injured" when my Jeep is not in drivable condition :)

On a side note...I believe that is a diode on that little plastic case near your water outlet. Is that correct? Do you still have it wired into the system? My fan came with some of the wires cut and it seems to run fine with just using the black ground and one or the other (high or low) striped wires. I am not sure the diode is still in the circuit. Does anyone one know if I need it for some reason. I am sure Ford put it there for a reason. I plan to clean clean up the wiring in the next few days. Thanks.
 
#26 ·
It's okay Stone Tower, I once knew what that thing was but since it was hardwired to the rest of the system, I left it place, possibly an ambient air temperature sensor? I know this gizmo is the Resistor;
Image
 
#27 ·
What you posted is the resistor that give you the low speed. The little thing I am talking about has (I believe) a diode symbol on it. A diode is sometimes used to stop current flow that would be generated by the fan turning when it is off due to the airflow at high speeds. The current can arc across the relay contacts and cause them to fail. Because my fan came from eBay, I was not aware that part of the wiring had been cut before I got it. It seems to work fine, I would just like to figure out how Ford had originally had it set up.