Jeep Enthusiast Forums banner
41 - 60 of 71 Posts
I've got the factory wiring manual with a Ground Distribution page in it.

There are 2 points on the left inner fender.

There is the engine dipstick tube stud. SUPER IMPORTANT!!

There is the ground to the lower diagonal dash brace to the left of the steering column.

There is one in behind the trim panel where the spare tire mounts.

The one on the instrument panel brace grounds a ton of things. Probably too many things as a matter of fact, given it's poor mounting point on the brace with a self tapping screw. I remove the screw that it's held on with, extend the wire, using the same gauge or bigger, and terminate it to the stud near the fusebox.

There are also grounds from the engine to chassis, notably the poor one from the back of the head to the firewall but that wouldn't affect your dash lights. Not that the engine to chassis grounding shouldn't be addressed. I'm working on a write-up for that in the near future.
how so? just curious. thx
 
MiddleMan, bulbs pull an amount of current to light. That amount of current can either be pulled through the size wiring you're using or it can't. When you have a corroded connection, consider that a smaller gauge of wire, barely any continuity at all. If they're corroded enough, there's no connection at all. So from the sounds of what you're doing, you've touched your problem, but not cleaned it enough. Something you've cleaned or plugged & unplugged is/was your problem. Clean it more or plug it a few more times. You want bare metal contacting bare metal to make a good connection.

how so? just curious. thx
It's one of the wiring mains. It ties the block to the negative terminal on the battery. Any sensor that's housing grounded uses that as a final path to ground.
 
how so? just curious. thx
I finished it. Here ya go.Don't take any shortcuts when doing this:
Renix Ground Refreshing

The Renix era XJs and MJs were built with an under-engineered grounding system for the engine/transmission electronics. One problem in particular involves the multiple ground connection at the engine dipstick tube stud. A poor ground here can cause a multitude of driveabililty issues, wasted time, and wasted money replacing unnecessary components.

The components grounding at the dipstick tube stud are:

Distributor Sync Sensor, TCU main ground, TCU "Shift Point Logic", Ignition control Module, Injectors, ECU main ground which other engine sensors ground through, Oxygen sensor, Knock Sensor, Cruise Control, and Transmission Sync signal. All extremely important stuff.

The factory was aware of the issues with this ground point and addressed it by suggesting the following:

Remove the nut holding the wire terminals to the stud. Verify that the stud is indeed tightened securely into the block. Scrape any and all paint from the stud's mounting surface where the wires will attach. Must be clean, shiny and free of any oil, grease, or paint.

Inspect the wire terminals. Check to see that none of the terminals are crimped over wire insulation instead of bare wire. Be sure the crimps are tight. It wouldn't hurt to re-crimp them just as a matter of course. Sand and polish the wire terminals until clean and shiny on both sides. Reinstall all the wires to the stud and tighten the nut down securely.

While you're in that general area, locate the battery negative cable which is fastened to the engine block just forward of the dipstick stud. Remove the bolt, scrape the block to bare metal, clean and polish the cable terminal, and reattach securely.

Another area where the grounding system on Renix era Jeeps was lacking is the engine to chassis ground. There is a braided cable from the back of the cylinder head that also attaches to the driver's side of the firewall. This cable is undersized for it's intended use and subject to corrosion and poor connections at each end.

First off, remove the cable end from the firewall using a 15mm wrench or socket. Scrape the paint off down to bare metal and clean the wire terminal. Reattach securely.
Remove the other end of the cable from the rear of the head using a 3'4" socket. Clean all the oil, paint and crud from the stud. Clean the wire terminal of the cable and reattach securely.

A suggestion regarding the braided cable:
I prefer to add a #4 Gauge cable from the firewall to a bolt on the rear of the intake manifold, either to a heat shield bolt or fuel rail bolt. A cable about 18" long with a 3/8" lug on each end works great and you can get one at any parts store already made up. Napa has them as part number 781116.

A further improvement to the grounding system can be made using a #4 cable, about 10" long with 3/8" terminals at each end. Attach one end of this cable to the negative battery bolt and the other end under the closest 10mm headed bolt on the radiator support just forward of the battery. Napa part number 781115.

If you want to upgrade your grounds and battery cables in general, contact Jon at www.kelleyswip.com. He makes an incredible cable upgrade for a very reasonable price.

Revised 11-28-2011
 
Discussion starter · #44 · (Edited)
Is it dedication, or stupidity, that makes one use his vacation days to fix the Jeep?

I took the last 3 days of this week off strictly to try and solve this problem, and do the refresh/cleaning of the lines.

Stupid or not, I'm looking forward too it!

Hopefully, I will have a solution to post on this come Friday.

Until then....

Thanks for the guidance folks....
 
Discussion starter · #46 ·
I'll call it dedication. Would you rather have a $600 a month car payment and have to carry full coverage insurance?
Agreed. I have had that exact conversation with many people in the last few years. Been asked endlessly, why I don't just buy a newer vehicle.

There's so many reasons for it, like you said...high payments, high insurance (right now I pay $70/mth for insurance while my wife who has 10 more years on me pays more than double for her new Mazda). That and the fact that a Jeep is like a giant piece of Lego to me. You know what it's supposed to look like when it's done, but you know it's going to be tedious to get there. When you do get there though, and everything looks and works they way you envisioned, it's worth every minute of pain/frustration and stripped knuckles.
 
Discussion starter · #47 ·
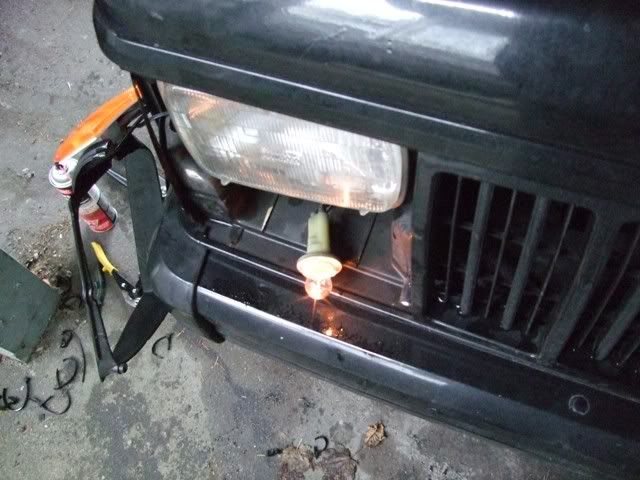
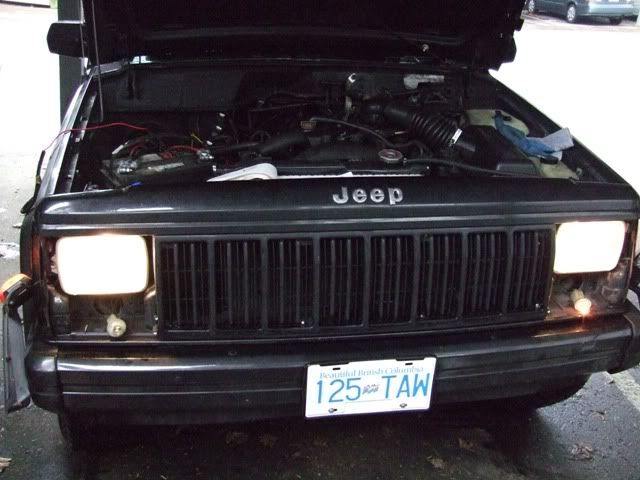
So I went through the harness etc... today and checked all connections (unplugged/cleaned). I managed to get my left turn signal going again, think it was a faulty bulb (I replaced all bulbs today to new). But still having the same issue with the pass side park/turn lamp. I took a couple pics here just to give an idea of what I'm looking at. I'll try to explain it as best as possible to get this thing done. It seems to me like I'm just missing one small issue.

So first pic is of the lights when I have no headlights on, but put on my right blinker...power (albeit weak).
Image


And with headlights on, nothing going to the pass side park/turn lamp.
Image


I have redone the grounds as suggested, checked the wiring to confirm no cracking or grounds missing or off.
So what happens is:

Headlight switch on(pulled out) - No light output to park lamp, but turn on signal and there is very weak blinking.

Headlights off-turn signal on, stronger (but still not full power) blinking.

Could there be an issue around the headlight switch itself? I'm assuming it is grounded to the dash ground like the rest of the panel etc...?

Not too sure where to look next :brickwall
 
Discussion starter · #50 ·
Thanks guys.

Carl48 - Lamps were done to spec, made sure of that one :)

Cruiser54 - When you say ground at park lamp,do you mean that within the 3 wires coming out of the socket one or more of them may be compromised? Or should I look for a specific ground in relation to the park lamp? I wasn't sure if the whole harness had one ground, or if each lighting circuit would have it's own. Also, thanks for the tip on the starter, looks like tomorrow should be fun:(
 
You probably already checked this, but make sure that the parking lamp and side marker lamp sockets are absolutely CLEAN and DRY...no oxidation, no moisture, no corrosion.

On my 91 XJ, the ground for the front lighting circuits is found on the left inner fender just aft of the PCM.
 
Discussion starter · #54 ·
Finally!!!

Fixed...knock on wood!
I went through the harness, grounds and everything else in that mess of a wiring set-up. One of the contacts within the connectors was loose at the wire, causing intermittent lights on the park side. Cleaned it up, reconnected and it looks good now. Turn signals all work to boot.
Time to move on to other "fun" adventures!!

Thanks for all the help guys, you saved me a ton of hassle more than once on this :thumbsup:
 
Discussion starter · #56 ·
My favorite mantra: RCBRC=Refresh Connections Before Replacing Components. Congratulations on sticking with it to the end.
Thanks cruiser. If you know of a way to ship beer across international borders without getting broken, let me know...I owe you guys a few micro-brews! Or we can just meet in Seattle :)

:cheers2:
 
Discussion starter · #59 ·
Sounds like you got it...way to stick with it. :thumbsup:
I'm very impressed, too. Great job.
Thanks guys, and thanks for the guidance on it. It's nice to find a conclusion to it. Looking forward to moving on to the next challenge, so I'm sure you haven't heard the last from me :D
 
On the question of electrical ground point on the Jeep, I have another question..
I have been trying to install a new battery on my Jeep Cherokee but the terminals are the wrong way around.. so I had to place the battery front to back. But this has resulted in the fact that the negative ground cable to the battery post is a tad too short to fit. I'd like to know if I run the battery negative to anywhere on the body of the car, will it be okay, or must it be connected to the engine ground as it was earlier?

thanks for your replies!
 
41 - 60 of 71 Posts