Okay, so you want to install an Aisin-Warner AW4 transmission into your OBDII ZJ, but have no idea about how to do it? The following is my writeup of the part list including the part numbers where needed as well as step by step installation steps. (Part numbers from dealership surrounded by asterisk's)
Parts list:
1X AW4 (Must be a 23 spline, found in 91 and up XJ's behind the 4.0, as well as select ZJ's in early 93)
1X Torque converter from an aw4
1X Flex plate from an aw4
1X Dustshield from an aw4 *53005907 AND 53004908*
1X TCM from same year XJ
3X connectors for TCM (there are two - one gray and one black - that connect to the body of the transmission and one that connects to the TCM)
4X Torque converter bolts (flex plate bolts are the same for both setups) *34202497*
1X AW4 shifter cable bracket *53007746*
1X AW4 Shifter cable *5207 8452*
1X AW4 Shifter bezel *55033646
1X Aw4 floor shifter for a 93 ZJ with the AW4 *53007749*
1X Tcase shifter bracket on the Transmission body *52077509* (I ended up not using this, I went with a Novak shifter kit for the 231 instead.
1X Cross member from a 93-95 ZJ (be sure to get the bolt that holds the mount onto it)
1X Cross member trans mount *52018857* (I bought from Advanced Auto PN - 621049)
1X Crank Position sensor (This one is tricky, you need to buy one out of an XJ, but you need to buy one out of the same year vehichle that you have. I have a 96, so I bought one from a 96 XJ with an Advance Auto part number of AL2017. This is due to the connectors, for some reason they changed them from year to year, but kept them the same across the board for the ZJ and XJ at least in 1996)
Assorted fittings for the cooler lines - I used the stock lines that came with the AW4 and spliced in soft lines
I installed an auxillary cooler in line after the stock cooler on the radiator - This isn't necessary but heat is the easiest way to kill a transmission
Driveshafts - I am using a driveshaft that is off a zj with the 42re and the 242. I tried to use a front driveshaft of a zj with the 42re and the 242, and it was too long; even after compressing it all the way, it couldn't even fit between the yokes. Another edit - The front driveshaft from an XJ with the aw4 and 4.0 WILL NOT fit, it only allows less than half an inch of travel, which isn't near enough.
Parts to reuse from your 42RE:
Flex plate bolts and spacer
Starter
Some bellhousing bolts, but you're going to have to buy some shorter bolts or get the ones off the aw4 equipped vehicle.
Crossmember bolts to "frame" rails
Procedure:
Removing the 42re
-This is a pretty straight forward process, so I'm not going to go into detail. I had no idea what I was doing and I still was able to do it really easily. A couple basic steps though, drop the back end of the transmission then remove all the connections off the transmission. Then unbolt the bellhousing including the starter and all of the bolts holding on the dust shield. You should be able to then rotate the flex plate to remove the 4 torque converter bolts. If everything is out, you should be able to rock the transmission off the back of the block, but be careful it falls off a jack easily.
Installing the aw4
-Everything should be out of the way and ready to install now.
![Image]()
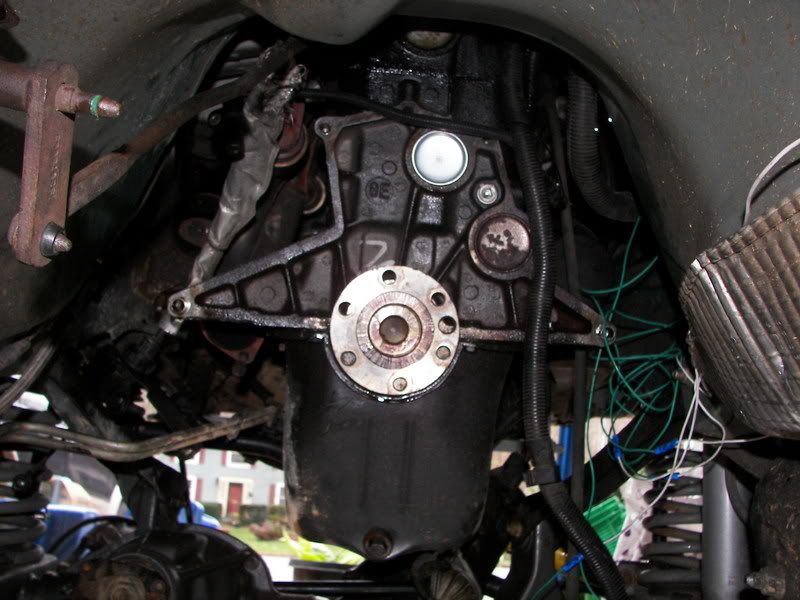
-Place the top portion of the dust shield on the back of the block. It aligns itself on pegs on either side of the block. Then install the flexplate and torque to spec. You're going to have to spin the flex plate around to line it up correctly because the bolt holes aren't concentric on the crank. Don't forget to install the spacer on the transmission side of the flex plate.
![Image]()
-Install the torque converter onto the input shaft of the transmission. Be sure to rotate it at least 90 degrees off vertical in both directions while pushing aftward. This is to ensure that the converter seats on both sets of splines on the input shaft.
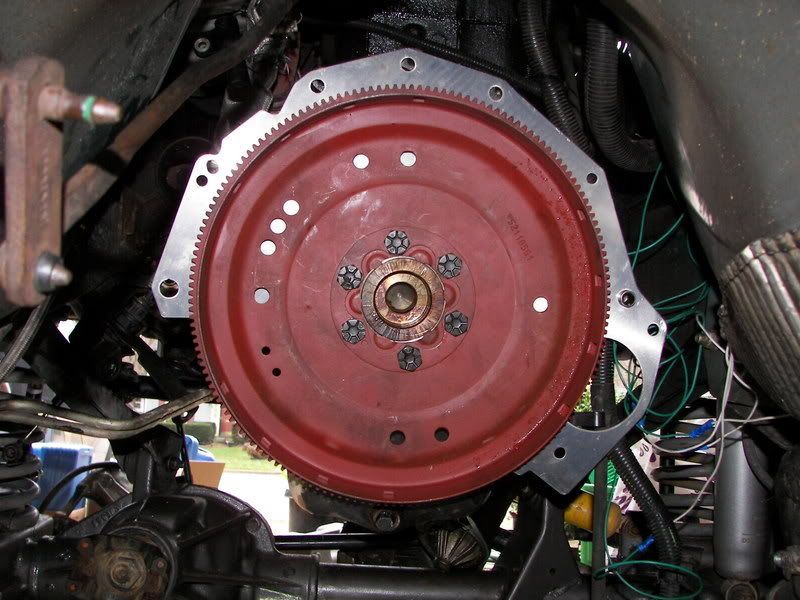
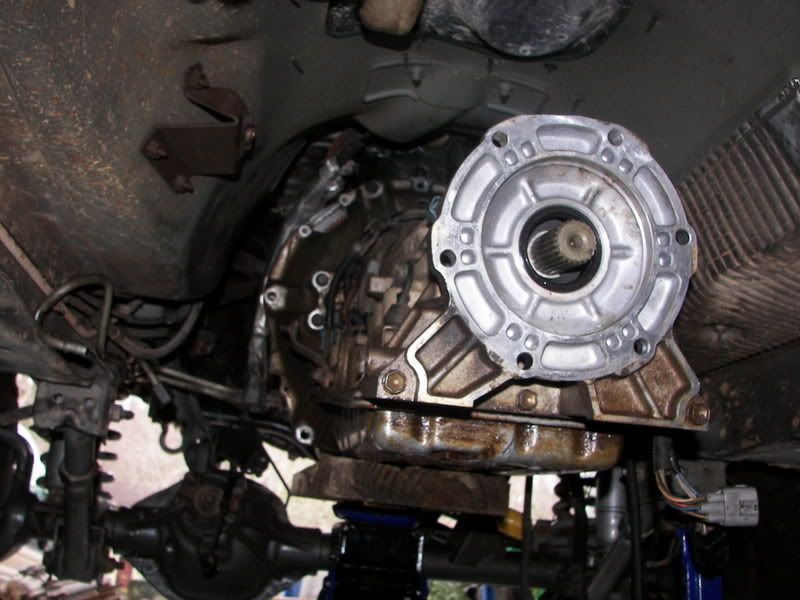
-At this point, you're really ready to put the transmission onto the back of the block. Get it under the jeep and jack it up high enough, then using the aforementioned pegs on the back of the block, line up the transmission and bolt it on. Be careful with this step. You shouldn't force it to mate up with the back of the block. If it is done correctly, it will easily go in. One tip about the torque converter bolts - install one but don't tighten it much. Then rotate the flex plate enough to get the opposite bolt in, then just work your way around to all the bolts, tightening them in increments. I tightened the first bolt too much and I couldn't spin the flex plate at all because the input shaft was at an awkward angle I guess. (SIDE NOTE - You can see where the bracket for the shifter cable goes in the following picture, it is just to the left of the center of the picture where there are two shiny spots with bolts in the middle of them on the backside of the bellhousing)
![Image]()
-Bolt the lower portion of the dust shield onto the bellhousing. Take care of little things at this point such as reinstall the starter onto the tranny. Also run the lines. I cut the stock lines for the AW4 and then used a flaring tool in order to run soft line. I used fuel pressure line.
-Using the pre-95 crossmember and the 93 ZJ mount, mount the rear of the transmission. Reinstall the Tcase.
![Image]()
![Image]()
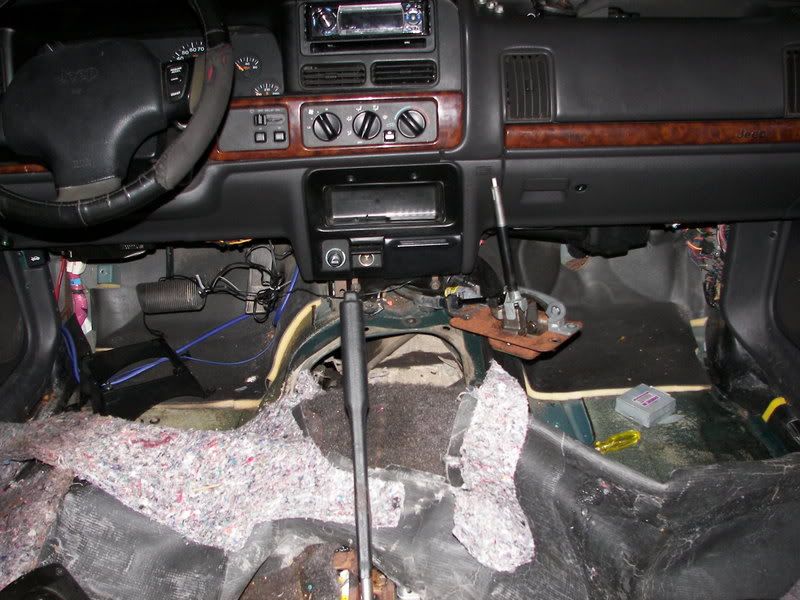
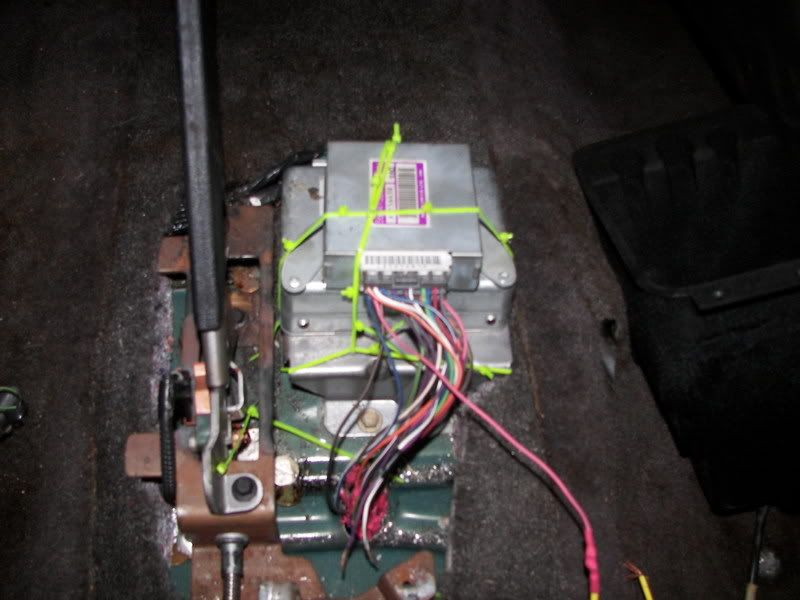
-Now for the interior and the shifter linkages. For the floor shifter, you have to use the one that shifts the aw4 because the gears are in different positions versus the 42re. You also have to use the aw4 shifter cable that goes between the gear selector and the gear selector on the body of the transmission. It may not make sense as to why you have to do this, but it's because the cable that actually moves within the shielding is a slightly different length. This picture shows the interior completely torn apart. This was because in order to install the 4wd linkages (I did this transmission swap to convert my ZJ into 4wd) I had to replace the pan that the gear selectors bolt to in order to mount the 231 handle. You won't have to remove the carpet to just replace the shifter and it's cable, but it would make it easier for the cable portion. I replaced the cable after I had already put the carpet back, so I ended up just cutting the carpet right along the shifter cable (~4" of carpet) and it made it very easy to R&R the cable. To remove the shifter handle you have to just pull really hard on it, but be careful when doing so (look at the last picture in the next set).
![Image]()
![Image]()
![Image]()
Parts list:
1X AW4 (Must be a 23 spline, found in 91 and up XJ's behind the 4.0, as well as select ZJ's in early 93)
1X Torque converter from an aw4
1X Flex plate from an aw4
1X Dustshield from an aw4 *53005907 AND 53004908*
1X TCM from same year XJ
3X connectors for TCM (there are two - one gray and one black - that connect to the body of the transmission and one that connects to the TCM)
4X Torque converter bolts (flex plate bolts are the same for both setups) *34202497*
1X AW4 shifter cable bracket *53007746*
1X AW4 Shifter cable *5207 8452*
1X AW4 Shifter bezel *55033646
1X Aw4 floor shifter for a 93 ZJ with the AW4 *53007749*
1X Tcase shifter bracket on the Transmission body *52077509* (I ended up not using this, I went with a Novak shifter kit for the 231 instead.
1X Cross member from a 93-95 ZJ (be sure to get the bolt that holds the mount onto it)
1X Cross member trans mount *52018857* (I bought from Advanced Auto PN - 621049)
1X Crank Position sensor (This one is tricky, you need to buy one out of an XJ, but you need to buy one out of the same year vehichle that you have. I have a 96, so I bought one from a 96 XJ with an Advance Auto part number of AL2017. This is due to the connectors, for some reason they changed them from year to year, but kept them the same across the board for the ZJ and XJ at least in 1996)
Assorted fittings for the cooler lines - I used the stock lines that came with the AW4 and spliced in soft lines
I installed an auxillary cooler in line after the stock cooler on the radiator - This isn't necessary but heat is the easiest way to kill a transmission
Driveshafts - I am using a driveshaft that is off a zj with the 42re and the 242. I tried to use a front driveshaft of a zj with the 42re and the 242, and it was too long; even after compressing it all the way, it couldn't even fit between the yokes. Another edit - The front driveshaft from an XJ with the aw4 and 4.0 WILL NOT fit, it only allows less than half an inch of travel, which isn't near enough.
Parts to reuse from your 42RE:
Flex plate bolts and spacer
Starter
Some bellhousing bolts, but you're going to have to buy some shorter bolts or get the ones off the aw4 equipped vehicle.
Crossmember bolts to "frame" rails
Procedure:
Removing the 42re
-This is a pretty straight forward process, so I'm not going to go into detail. I had no idea what I was doing and I still was able to do it really easily. A couple basic steps though, drop the back end of the transmission then remove all the connections off the transmission. Then unbolt the bellhousing including the starter and all of the bolts holding on the dust shield. You should be able to then rotate the flex plate to remove the 4 torque converter bolts. If everything is out, you should be able to rock the transmission off the back of the block, but be careful it falls off a jack easily.
Installing the aw4
-Everything should be out of the way and ready to install now.
-Place the top portion of the dust shield on the back of the block. It aligns itself on pegs on either side of the block. Then install the flexplate and torque to spec. You're going to have to spin the flex plate around to line it up correctly because the bolt holes aren't concentric on the crank. Don't forget to install the spacer on the transmission side of the flex plate.
-Install the torque converter onto the input shaft of the transmission. Be sure to rotate it at least 90 degrees off vertical in both directions while pushing aftward. This is to ensure that the converter seats on both sets of splines on the input shaft.
-At this point, you're really ready to put the transmission onto the back of the block. Get it under the jeep and jack it up high enough, then using the aforementioned pegs on the back of the block, line up the transmission and bolt it on. Be careful with this step. You shouldn't force it to mate up with the back of the block. If it is done correctly, it will easily go in. One tip about the torque converter bolts - install one but don't tighten it much. Then rotate the flex plate enough to get the opposite bolt in, then just work your way around to all the bolts, tightening them in increments. I tightened the first bolt too much and I couldn't spin the flex plate at all because the input shaft was at an awkward angle I guess. (SIDE NOTE - You can see where the bracket for the shifter cable goes in the following picture, it is just to the left of the center of the picture where there are two shiny spots with bolts in the middle of them on the backside of the bellhousing)
-Bolt the lower portion of the dust shield onto the bellhousing. Take care of little things at this point such as reinstall the starter onto the tranny. Also run the lines. I cut the stock lines for the AW4 and then used a flaring tool in order to run soft line. I used fuel pressure line.
-Using the pre-95 crossmember and the 93 ZJ mount, mount the rear of the transmission. Reinstall the Tcase.


-Now for the interior and the shifter linkages. For the floor shifter, you have to use the one that shifts the aw4 because the gears are in different positions versus the 42re. You also have to use the aw4 shifter cable that goes between the gear selector and the gear selector on the body of the transmission. It may not make sense as to why you have to do this, but it's because the cable that actually moves within the shielding is a slightly different length. This picture shows the interior completely torn apart. This was because in order to install the 4wd linkages (I did this transmission swap to convert my ZJ into 4wd) I had to replace the pan that the gear selectors bolt to in order to mount the 231 handle. You won't have to remove the carpet to just replace the shifter and it's cable, but it would make it easier for the cable portion. I replaced the cable after I had already put the carpet back, so I ended up just cutting the carpet right along the shifter cable (~4" of carpet) and it made it very easy to R&R the cable. To remove the shifter handle you have to just pull really hard on it, but be careful when doing so (look at the last picture in the next set).